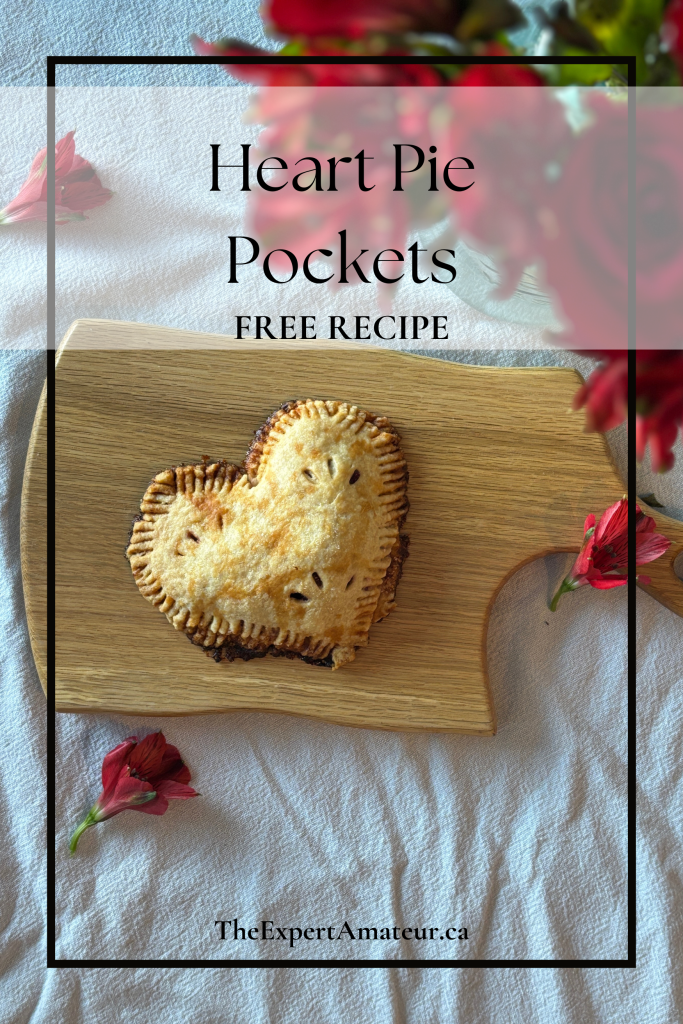
I am all about my pies and I’ve been wanting to try making a pie pocket for awhile now. Valentine’s was coming up so this was the perfect opportunity to make some heart shaped pie pockets and they turned out SO AMAZING!
**First off you will need to use my Pie Dough Recipe found on my other blog post. Then come back here and follow along to make these sweet heart shaped pie pockets.**
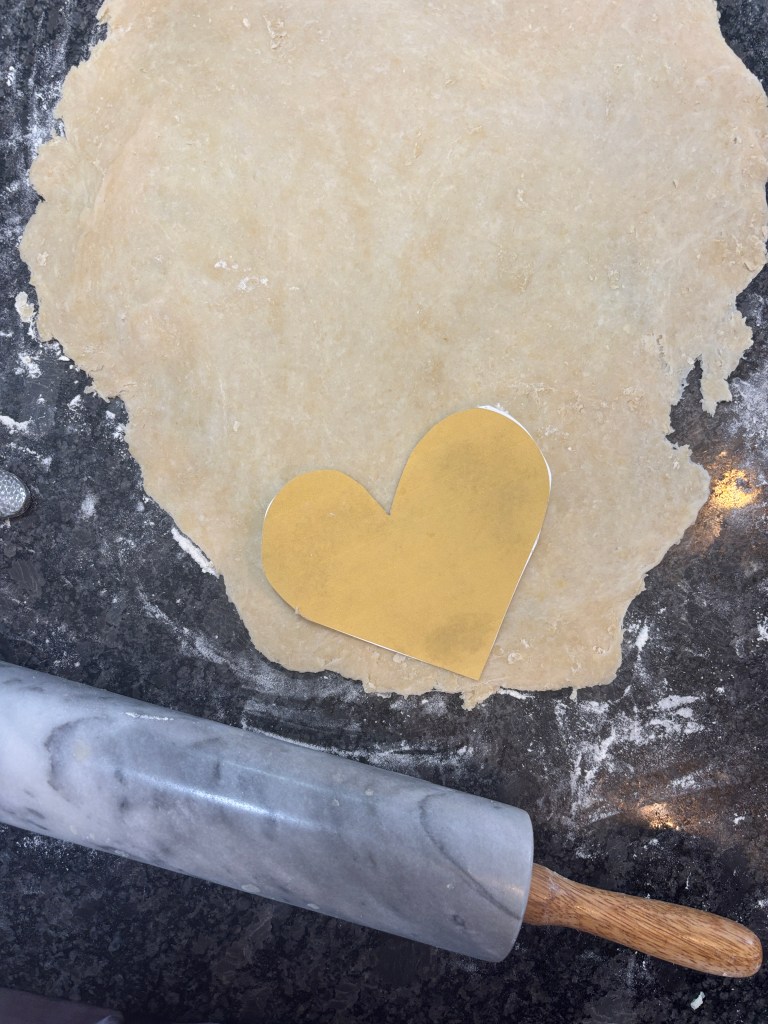
You could really make these with any shape but I will give you the template for the heart shape that I created so that you can create your own.
THE PROCESS
First off, the pie dough recipe was enough for me to make 13 heart pie pockets. You could also make less and freeze the rest of your dough for future full size pies or pockets.
I rolled my dough out to about 1/8 inch thick on a floured surface and then used my heart template to cut out your heart shapes. **NOW after playing around with making the pies I cut my top pieces a bit larger than my bottom pieces. Just cut around the heart template an extra 1/4 inch.
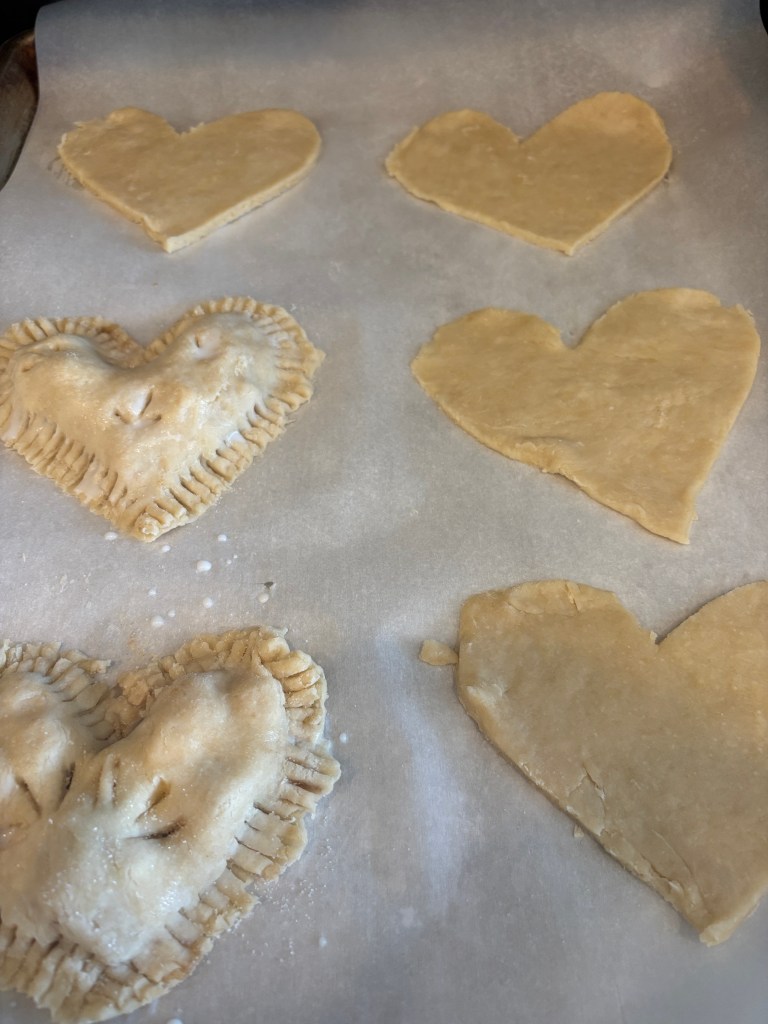
I laid my bottom heart down on the parchment paper on the baking sheet and started filling it. I left about 1/2 inch of space around the entire edge of the heart so that it could be sealed well and I put about 3 Tbsp of filling in the pie.
Next I put my larger cut out heart on top and used a fork to push together the crust around the entire edge. **If your shape gets kind of wonky, just cut of the pieces that stick out of place and gently push the dough back into the heart shape.
Poke some holes into the dough so that it doesn’t ooze out the edges when cooking. Then brush lightly with milk and sprinkle with sugar.
Cook in the oven at 350 Degrees F for around 45 min.
I put apples in some of my pies and plums in some. The plum pies were AMAZING! Highly recommend making plum pie. Also if you do apple pie I recommend peeling your apples for a nicer soft inside.
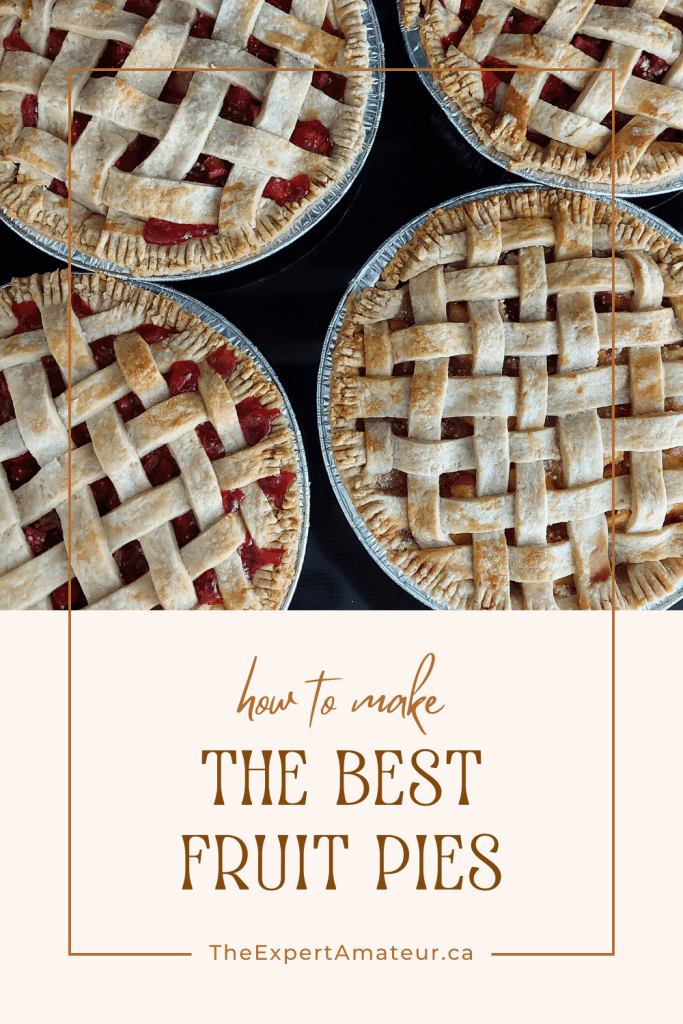
One of my go to bakes to gift people is pie. Pie is my love language and I love to gift pies to people all the time. My wonderful Granny has passed down a delicious pie recipe that never fails and can be used with any fruit!
The classic pie I always have to make is Rhubarb Strawberry but I also love to make peach pie and apple pie. I recently tried plum pie and it did NOT disappoint. The recipe will work for any fruit pie.
Here is the recipe. Enjoy and please let me know if you choose to make this pie and what fruit you use! Also tag me on instagram @the.expert.amateur
We are going to Disney World!! Growing up, I was so fortunate to frequent Disney World quite often with my family and it turned me into a true Disney Nerd. It has been over 8 years since I have been there and it will be the first time I take my kids!! My excitement level is off the charts.
We will be going for one week and 6 days will be at the parks. My kids are 4 years, 3 years and 6 months old. My 4 and 3 year old daughters are currently living in their princess era and have a different princess dress on every day. The very first day, we have lined up a princess character breakfast, where they will get to meet some of the princesses while we eat.
Now, I know they probably won’t remember this trip when they grow up, as they are still pretty young, so I wanted to create something that I can fill in with them to recap each day we are there!
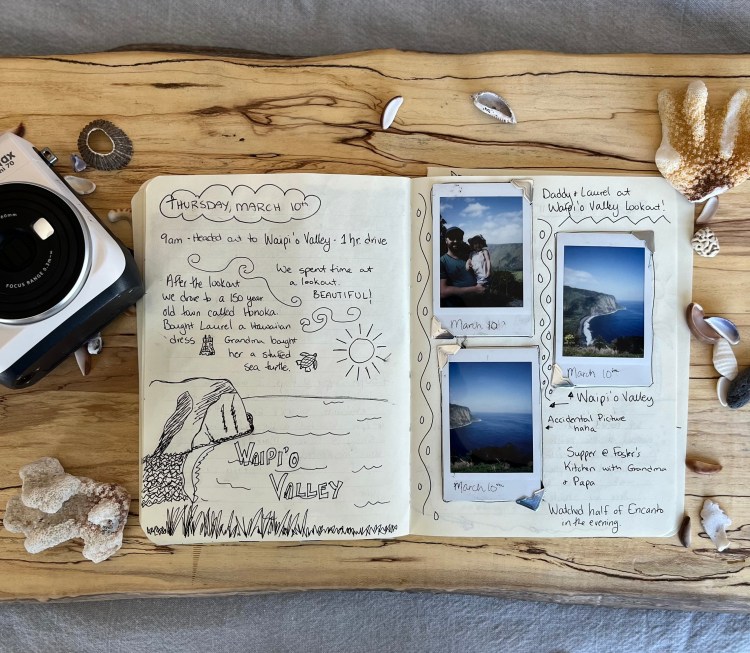
I always like to create vacation journals myself. Check out this one from a trip to Hawaii. I like to draw and write out daily things we do throughout our trips as a fun memento to look back on.
My Travel Journal from a trip to Hawaii
I created this free printable that is kid friendly. I will be filling it out for my daughter’s throughout the trip, but it would be a great printable for older kids as well to fill out themselves!
There is a page that is specific to a day at Disney World and then there is a more generic Travel Journal day for use when you aren’t at the parks or if you want to use for any other vacation!
I always take a polaroid camera with us when we travel and I am going to try and take a picture every day to put in the journal in the photo spot. You could also have your child draw a picture of something you did that day!
I picked up a Project Duotang from Dollarama for $2 to put all of the journal pages in. The Project Duotang has 20 protective sleeves built into the duotang that you can slide your journal pages into to keep them protected.
I hope you enjoy this free printable! Subscribe and follow me on Instagram at @the.expert.amateur to stay in the loop on new printables and fun crafts!
We made it to February after 100 days of January. After getting through a month long of colds, flus and pink eye we are all finally relatively healthy over here and I finally have energy and time to make things! Between baking, cooking and crafts, here are the things I made or worked on this week!
Banana Spinach Muffins aka THE MONSTER MUFFINS
With 2 toddlers running around constantly and burning energy, snacks are in HIGH demand over here. This is the second time we made a batch of these delicious green muffins.
Why are these so great??
Everything is mixed in a blender
HEALTHY and TASTY – No sugar – honey is the sweetener
They are one of the healthiest muffins and also taste SO GOOD. The recipe is from DetoxInsta. She creates delicious and healthy recipes for your home. Go check out her instagram! I used almond butter instead of peanut butter and I did not add any chocolate chips and my kids still loved them.
I also invested in some silicone mini muffin pans and I must say, there is ZERO regret. They bake great, pop out easily and then pop those silicone molds in the dishwasher to clean.
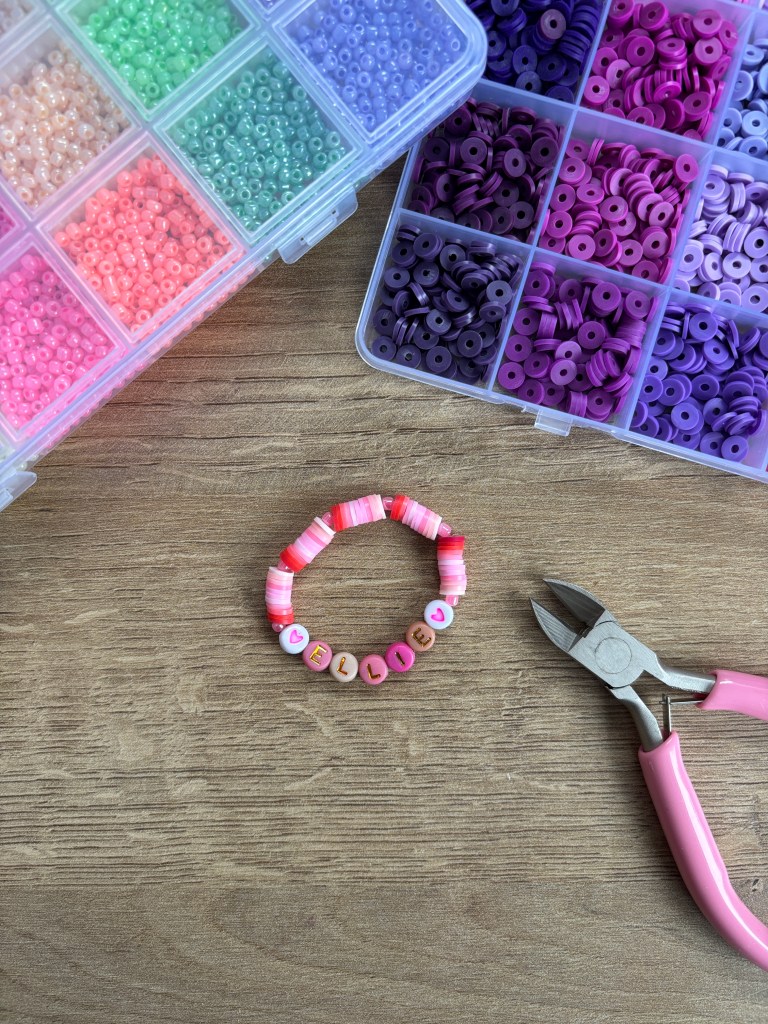
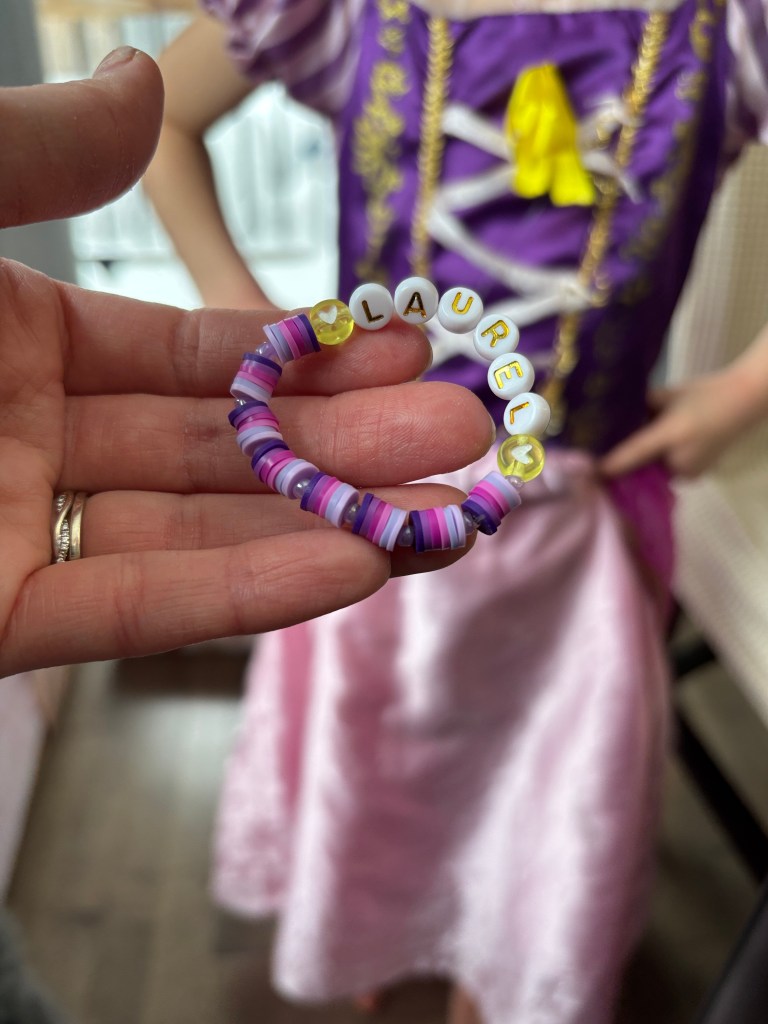
My girls are huge into bracelet making, but I only let them use pony beads and pipe cleaners. I felt like we needed to up our bracelet game and so we purchased this Bracelet Making Kit. There was so much fun to do with them and the customization is unlimited with all the colour options.
Laurel, my 4 year old is fully living out her princess era currently and so we created a Rapunzel themed bracelet for her. With my younger girl, Ellie, we went with a classic Valentine’s colour theme. This activity was too challenging for them to do on their own so I made the bracelet for them, but they had fun picking their colours and beads. It was a fun bonding activity with a beautiful outcome.
3. Started a Crochet Cardigan!
My plan was to make a cardigan for both of my daughters for Christmas and that did not come to fruition. Christmas projects and a market I signed up for, took over and I lost all time to make them. I am finally getting to work on my 4 year old’s cardigan and hoping to finish it for her 5th birthday in May.
I chose the 4 colours I am going to use for it and started crocheting the rim. I will hopefully be able to work on this on evenings where my husband and I catch up on our tv shows.
I am making the Riverbed Cardigan by CJ Design. She creates amazing patterns and has a wonderful blog where she posts the patterns for free! I am so excited to see how this comes together. Stay tuned for updates.
Valentine’s is coming up this next week and my 4 year old is getting excited for her Valentine’s Preschool Party. I love to make anything homemade I can so I decided to make my own fun Valentine Printables in CANVA. I am really starting to have fun with CANVA lately and really digging into all the templates and printables you can create in it. Stay tuned for more fun printables soon…
I also decided to purchase some fun Rainbow Scratch Notes for her classmate to go along with the printable. The kit comes with 24, and includes a stencil for every notebook and little baggies to put all the supplies into.
This was fully inspired by my sister. I am a self proclaimed anti beef taco fan. I just can’t enjoy soft shell tacos or hard shell tacos and my husband has been quite sad about this since he loves beef tacos.
I do however love burritos, and my sister recently told me how she made her tacos in a soft shell, adding rice and beans, and then pressed it in her little electric panini press. I also have a panini press that has been collecting dust in my pantry for the past few years, so I pulled it out and made some taco burritos and it was amazing and SO SIMPLE.
RECIPE : Literally add whatever you would add in a taco, plus rice, beans, avocado and corn. Fold up your burrito, press in your little electric press and bang! Easy, delicious supper. Plus it stays together and doesn’t fall apart all over the place. Next up is to make a breakfast version of this.
**ate this too fast and forgot to take a picture haha
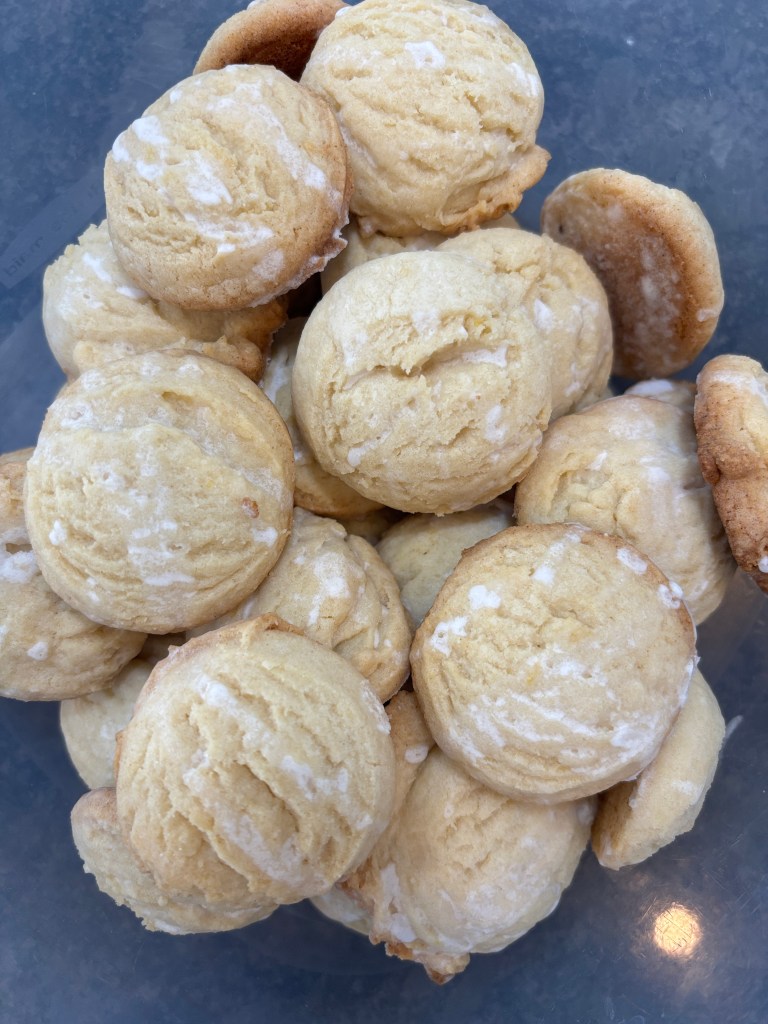
6. Lemon Cookies
So I asked my husband to pick me up a couple of lemons about two weeks ago and he ended up getting a bag of 20! So we have got a lot of lemons in our fridge. I love to use them for homemade sauces and vinaigrettes, but it is still going to tkae me awhile to get through them all. Hence, the lemon cookies. I found this recipe by Lemon Peony and decided to try it out. I definitely left them in the oven too long, as they came out more crisp than chewy unfortunately. But they are a decent tasting sugar cookie!
My oldest is in preschool and so we are in the era of Valentine’s cards and celebrations!
I have really loved playing around in CANVA and creating many useful things. It is the perfect program to make your own Valentine’s cards. My daughter helped me pick out the images and colour style for all the cards . We had so much fun creating them together!
Please enjoy this free template to use for your own kids. Just purchase some cardstock and make sure your printer is full of ink and voila! Print away!
I have two options to download. One has the ‘to’ and ‘from’ spots on it and one just has the ‘from’ section. In preschool the students were asked just to put their name on it so that the teachers don’t have to so I just took off the ‘to’ section.
I paired my valentines’ this year with these fun Rainbow Scratch Pads . My girls love creating designs on these!
Please enjoy this free printable and Happy Valentine’s Day!
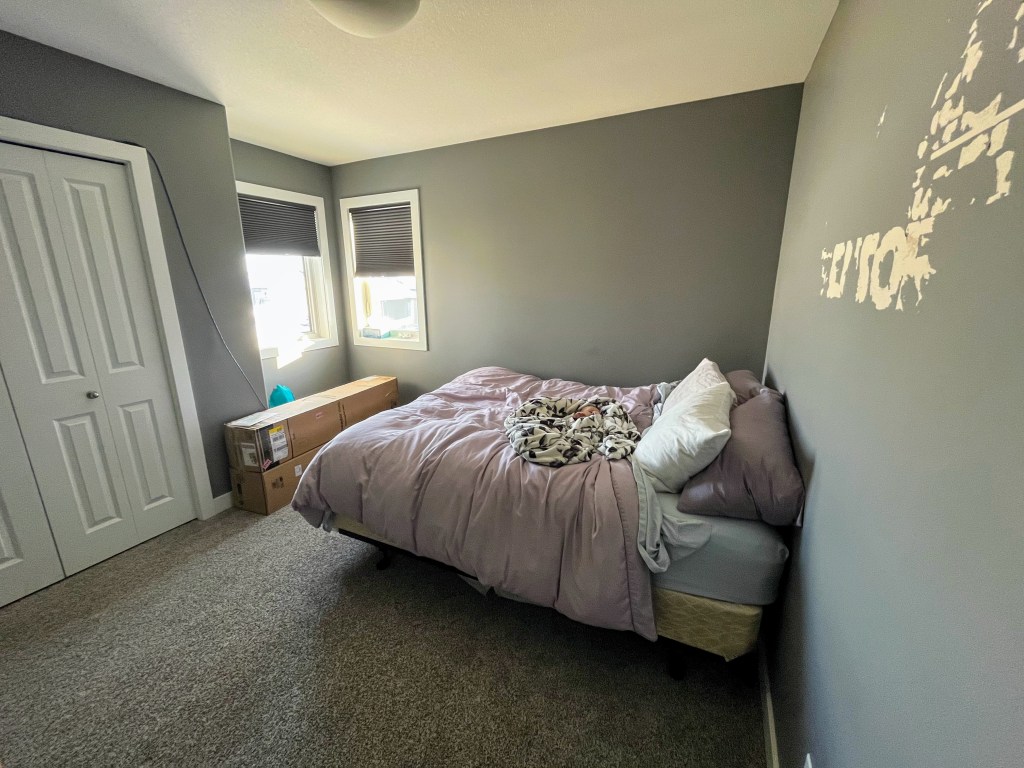
This has been a long process to transform our guest bedroom into Laurel’s toddler haven, but it is finally done! (with the exception of a couple small items).
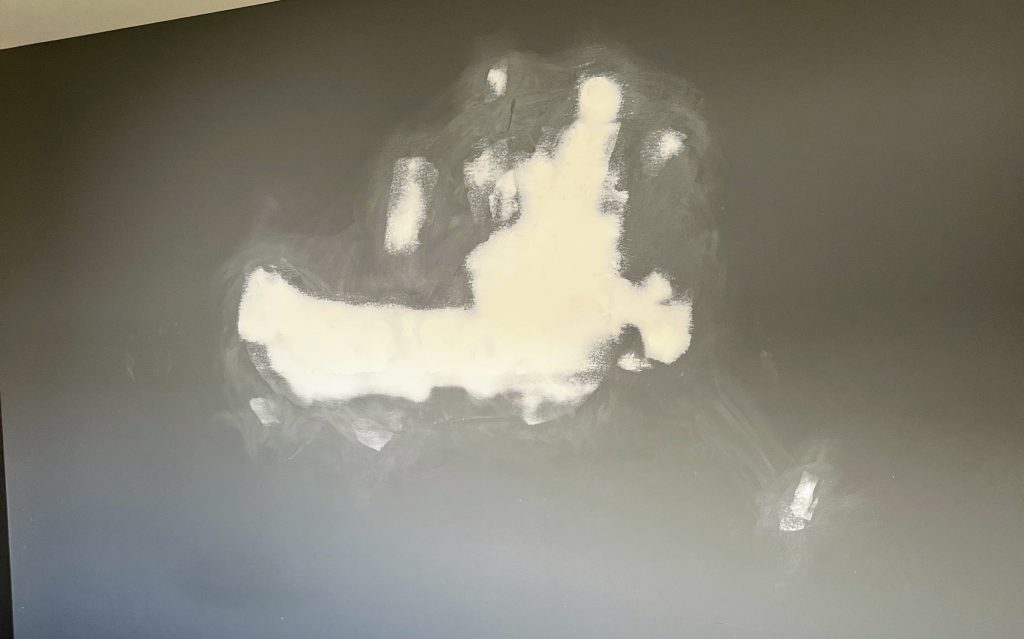
When we bought our house, the previous owners had a giant mural with their child’s name on the wall and when we went to remove it, a thin layer of dry wall peeled off with it. We left the wall for a year and a half, as we had siblings and family living with us on and off during that time and that was the guest bedroom. But ever since our second child Eleanora (Ellie) came into the picture, I knew I wanted to fix up the wall and turn the room into a fun, safe space for Laurel, as she needed to move out of the crib so Ellie could move in to the baby room. Thank goodness for my Father-in-law who knows how to mud and fix walls!! It just took me a year and a half to finally tackle the room and convert it into a toddler bedroom for our eldest daughter, Laurel, but the end result has me (and thankfully Laurel) very pleased!!
Read on to see all the items I used to change Laurel’s room into the sweetest little girl haven!
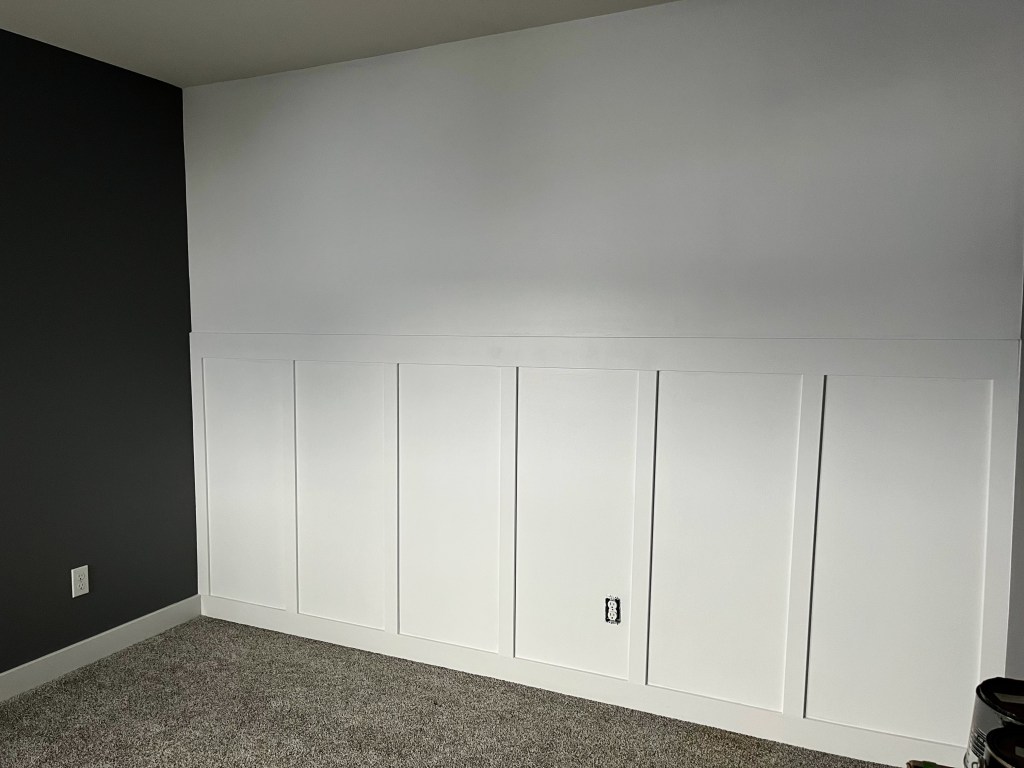
Before Pictures of the Bedroom
After Pictures!!
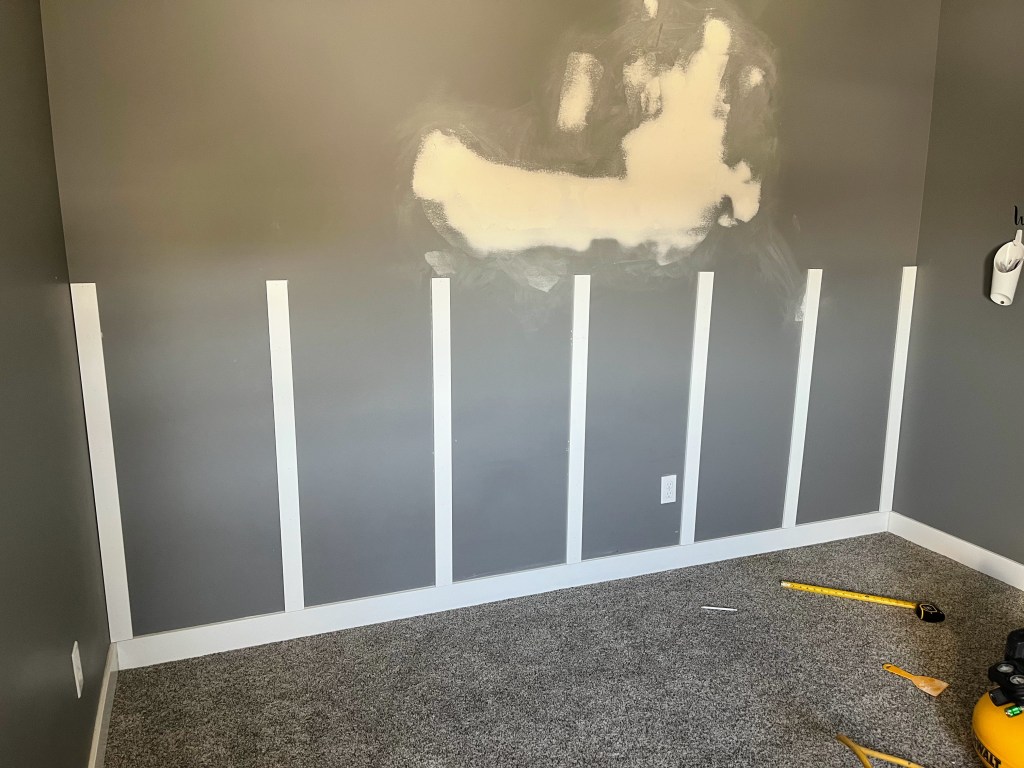
Board and Batten Wall
Step 1 – Mud and Sand wall
The wall was the biggest undertaking for this toddler room. I always loved seeing bedrooms with the board and batten so I did my research for a month and read up on several blogs and finally felt confident enough to try it! Before I put up the boards though, my father-in-law fixed up the ripped dry wall by mudding and sanding first. Thank goodness for handy family members to help me and teach me!
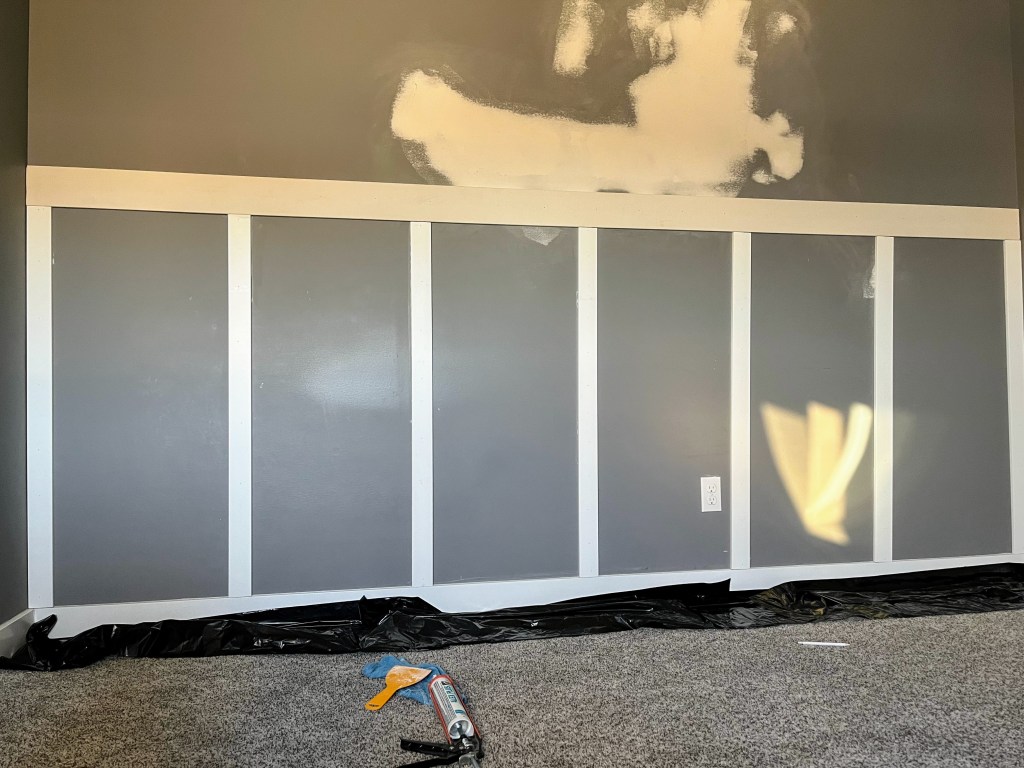
Step 2 – Apply Boards
There were two different blogs that I read that helped me with how to do this. The one that was most useful was actually the Home Depot blog. It has a list of all the materials and steps to create an easy DIY board and batten wall. If you are interested in doing a board and batten wall I recommend you check out the Home Depot steps to build one.
The other great resource I found was by Angela Marie Made and she has really great YouTube video on how to make a board and batten wall. Here is the video.
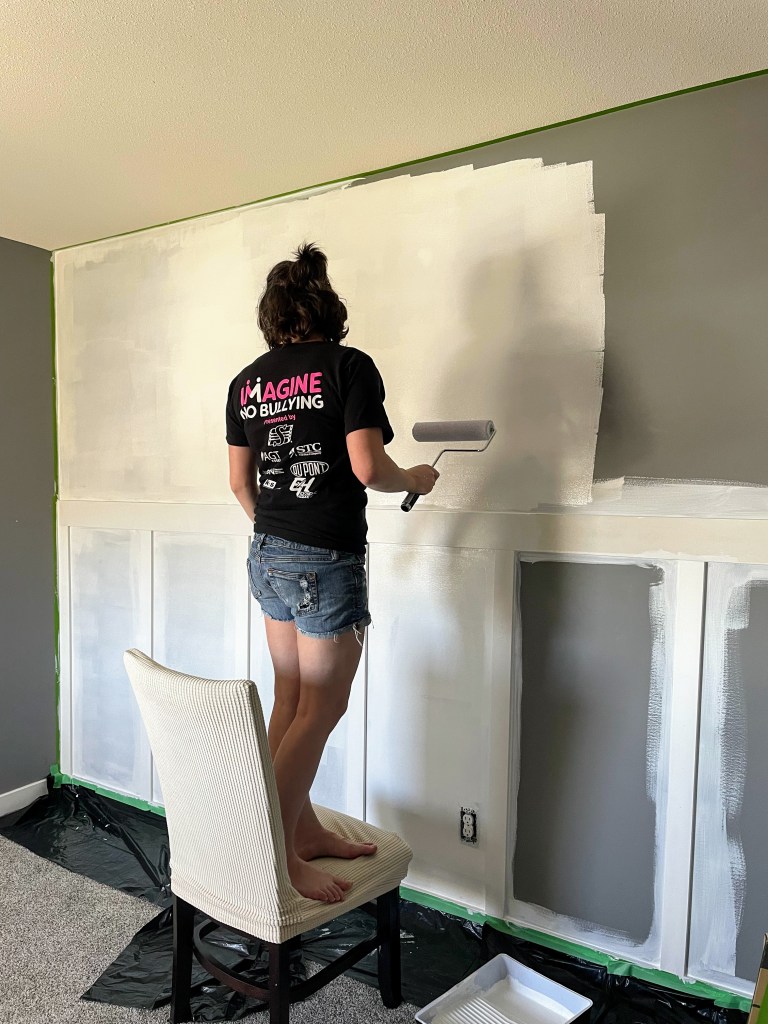
Step 3 – Paint! After applying the wooden boards I painted the wall first with 2 coats of primer and then 2 coats of this white paint. Check out my photo below to see what Primer and Paint I used.
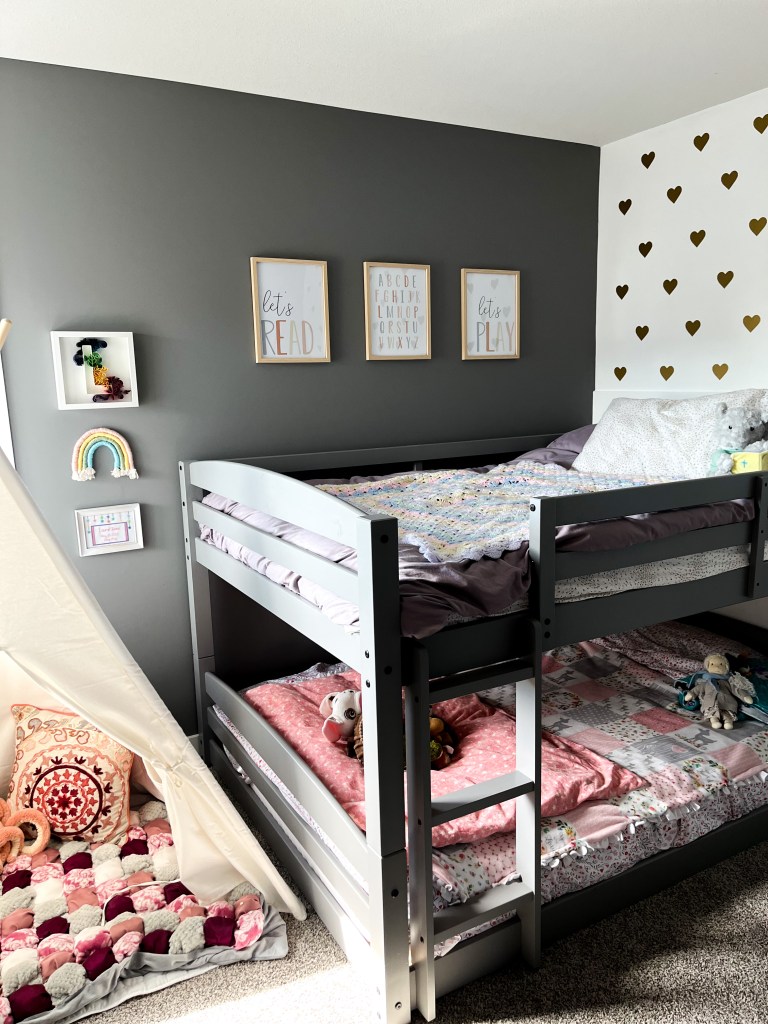
Heart Decals
I wanted to add a wall paper originally to the top half of the board and batten wall but after researching I was discouraged by the price of the ones I actually thought were nice.
So instead, I employed my Sihouette!
I bought one 5 ft. roll of gold removable vinyl at Michaels for $13!!! and it was the perfect amount for all the hearts I applied to the wall.
I measured out the 2 bottom rows of hearts first and applied them and then used a 3 foot long board to help me measure out where all the hearts would go on the wall.
I marked on the board the height of each heart so that I could line it up and place it perfectly above the bottom rows.
If you are wanting more information on the Silhouette, check out my blog post about why it’s one of my favourite crafting tools.
I love this bed because it is a floor bed on the bottom bunk.
It was a very easy transition for my daughter when we moved her out of the crib at 1 year and 9 months old.
The bunk bed is a double mattress which is awesome. The girls will be able to use the beds for a long time.
I also love that the bunk bed can be separated into two separate beds if we choose to do that in the future.
The one downside that I have about the bed is that because it is a floor bunk, Laurel sometimes bumps her head on the top bunk getting in and out of the bed. Nothing major but it would be nice to have the option to raise the bed up higher when she is older.
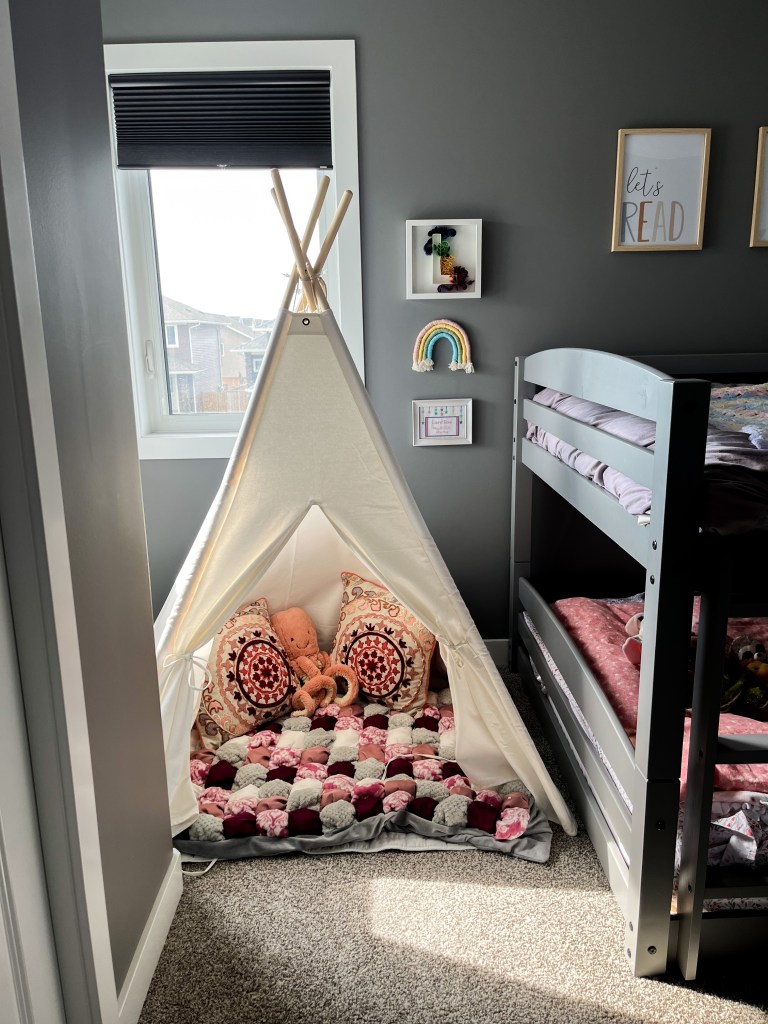
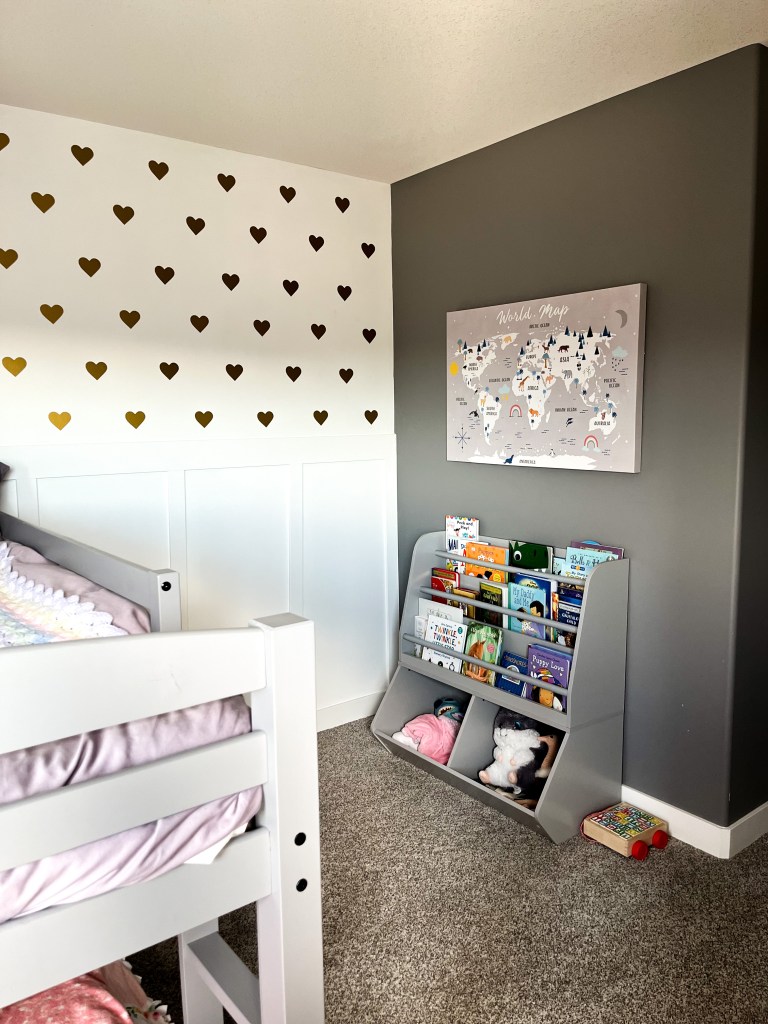
Bookcase with Toy Bin – So far I love this purchase! Great way to store books and toys in the room. Just make sure you anchor it into the wall so that it can’t tip over. It comes with all the hardware to anchor it.
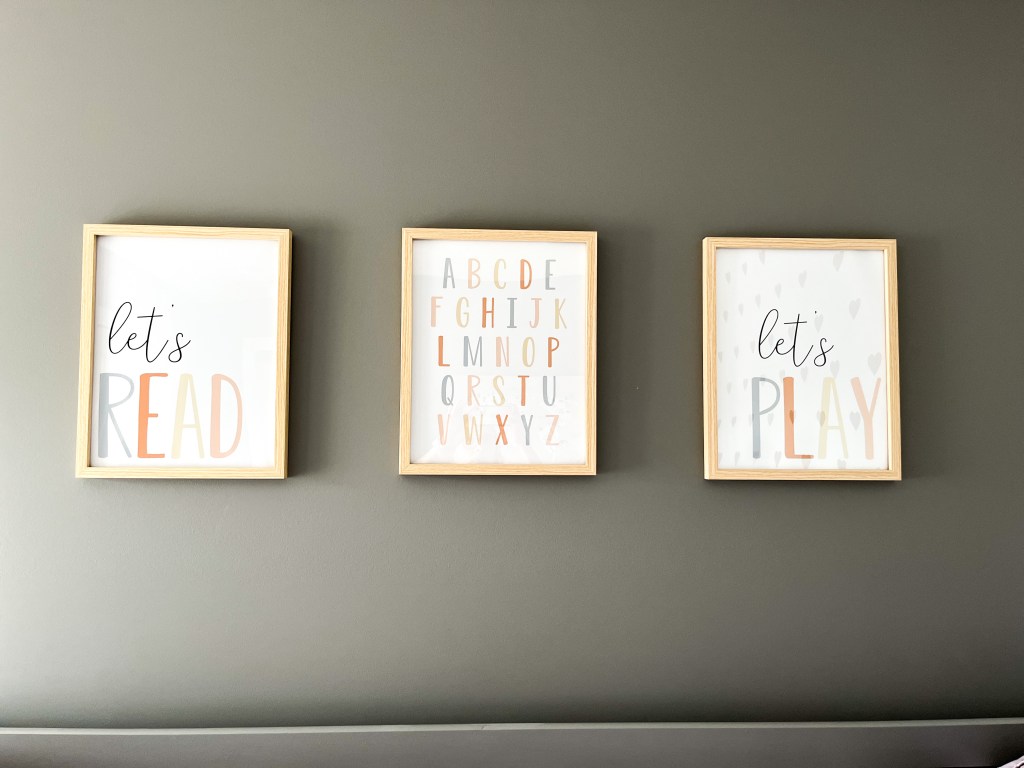
Let’s Read, Let’s Play and Alphabet Posters – I purchased these posters off of Etsy and then printed them online through Walmart. It is a bit cheaper than other online sites and then you just have to pick up when it is ready.
Frames for Posters – These are from Amazon. They are actually a faux plastic wood frame and come in a pack of 2. It is also a clear plastic, instead of glass in the frame, which I prefer for a kids room. I love how they look!
Tent – This has already gotten so much use since Christmas! It is a good size for multiple kids to enjoy at the same time. Comes with a white mat to go underneath and twinkle lights to string up on it. The pillows in the tent were found at Bed Bath and Beyond in their sale section a couple years ago.
The Solar System Decals – Laurel has been super interested in space recently so I filled the underside of the top bunk with glow in the dark stars and planets! We go through the order of planets before she goes to sleep each night.
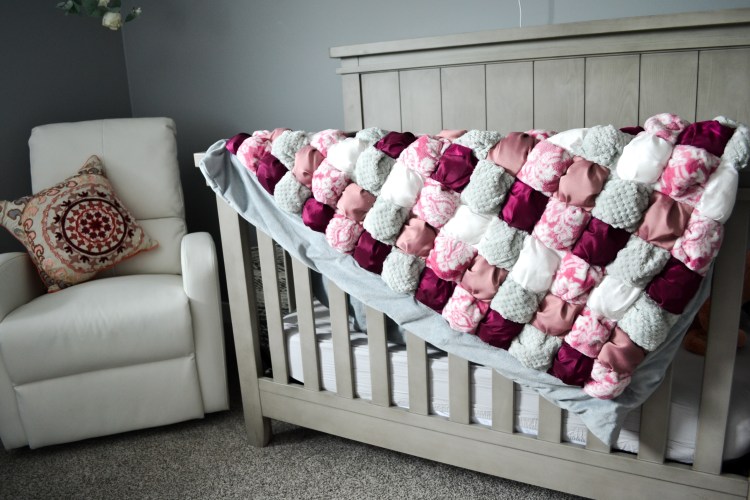
The Puff Quilt – The puff blanket in the tent was something I made a few years before I had kids. I am not a sewer, but was a pretty easy project to complete.
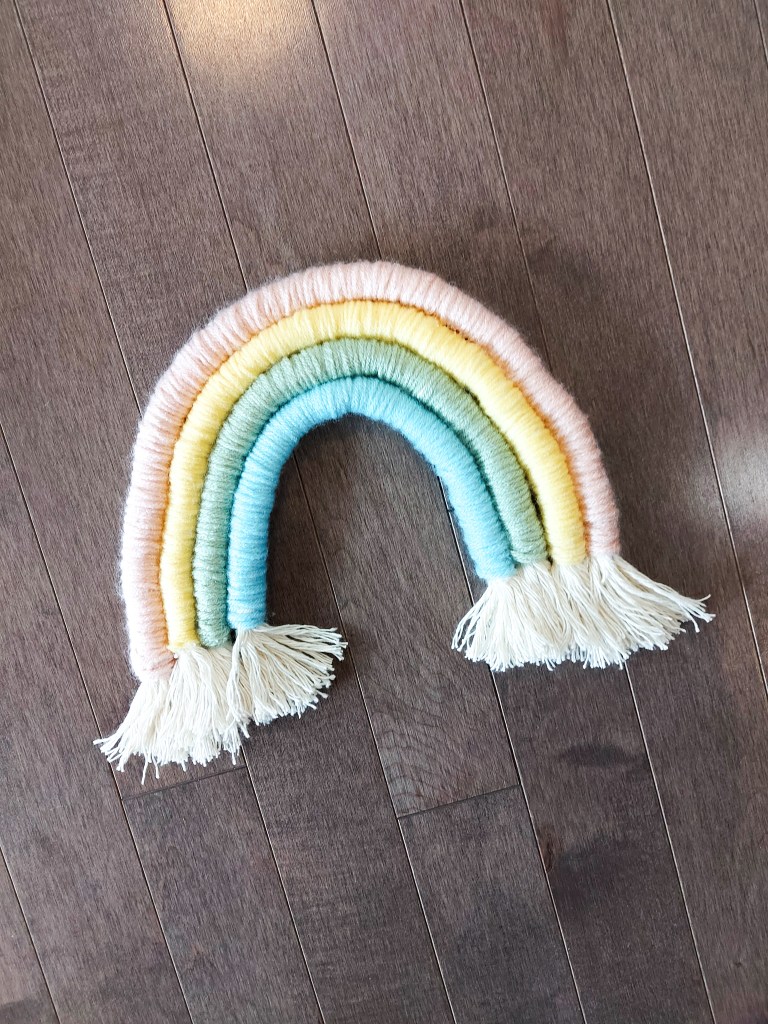
The Macramé Rainbow – This was another project I made. It is very easy to follow and you only need a few supplies!
The other blankets and art were homemade by family members and gifted to Laurel when she was born. I am so lucky to be a part of a crafty, thoughtful family!
There are still somethings I would like to add in the entry of the room but for now I am so in love with this space! Laurel loves to play and look at books in her room and had a very easy time transitioning from her crib into her big girl bed!
It was definitely a labor of love to put together this room but it makes me so happy to walk into it every day!! It was my first time painting a wall and doing a wood project and I am so happy with both! There are definitely some imperfections but it has shown me that I am capable of learning new things and taking on projects while I have two little ones running around. I am already thinking about ways I can improve other rooms in our house!
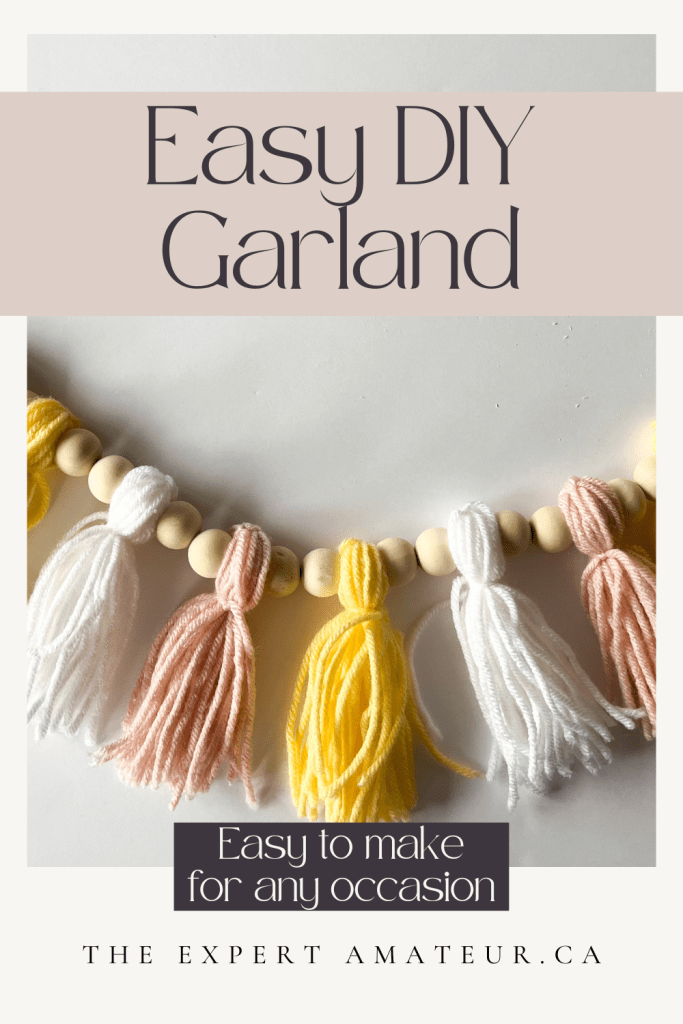
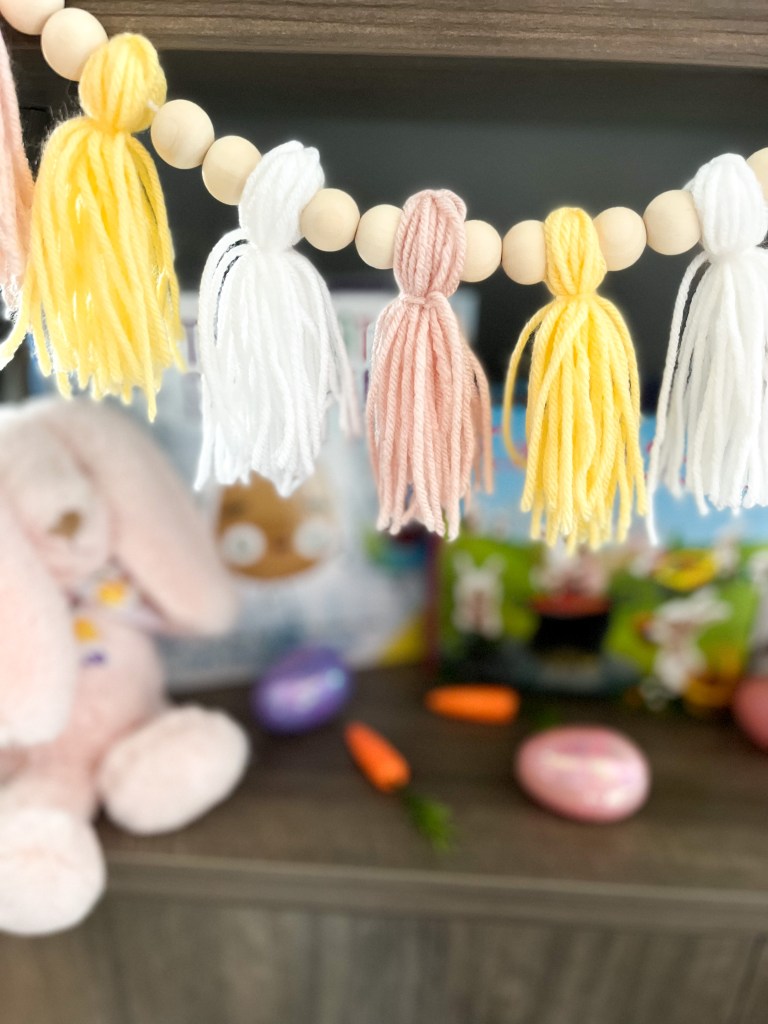
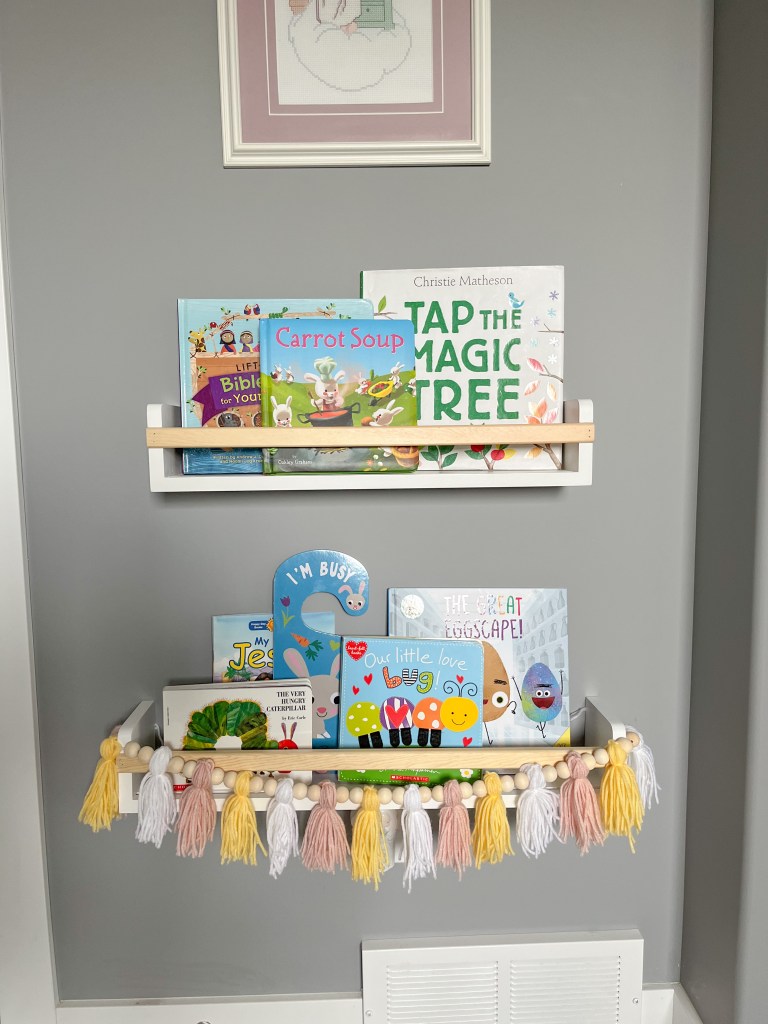
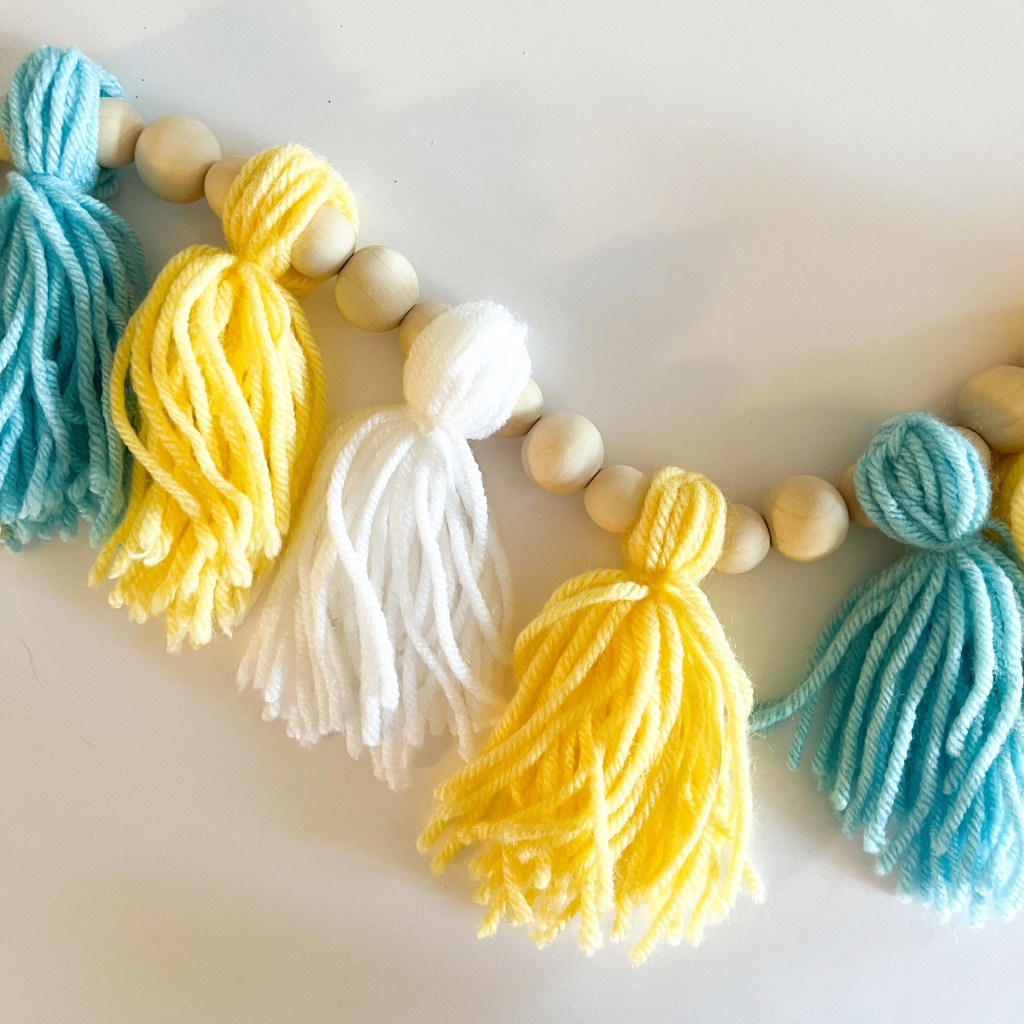
Beads and yarn! These can be used in so many ways to make crafts. A simple, yet sweet way to use it is to make a garland. Just grab your favourite colours of yarn, some wooden beads, a needle and you are good to go.
MATERIALS
yarn – whatever you prefer! I used a basic, inexpensive weight 4 yarn
book or cardboard to wind yarn around. (If you are desperate you can also use your fingers)
HOW TO MAKE – only 2 steps!
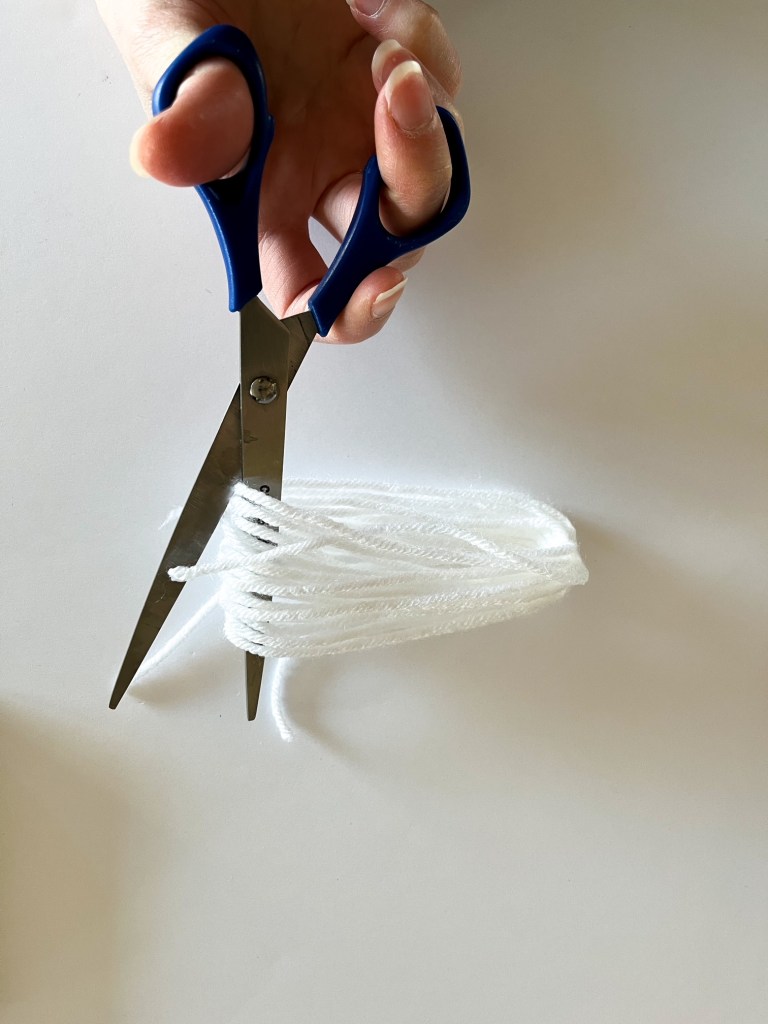
Step 1 – I used one of my daughters small board books to wrap my yarn around to make the tassels.
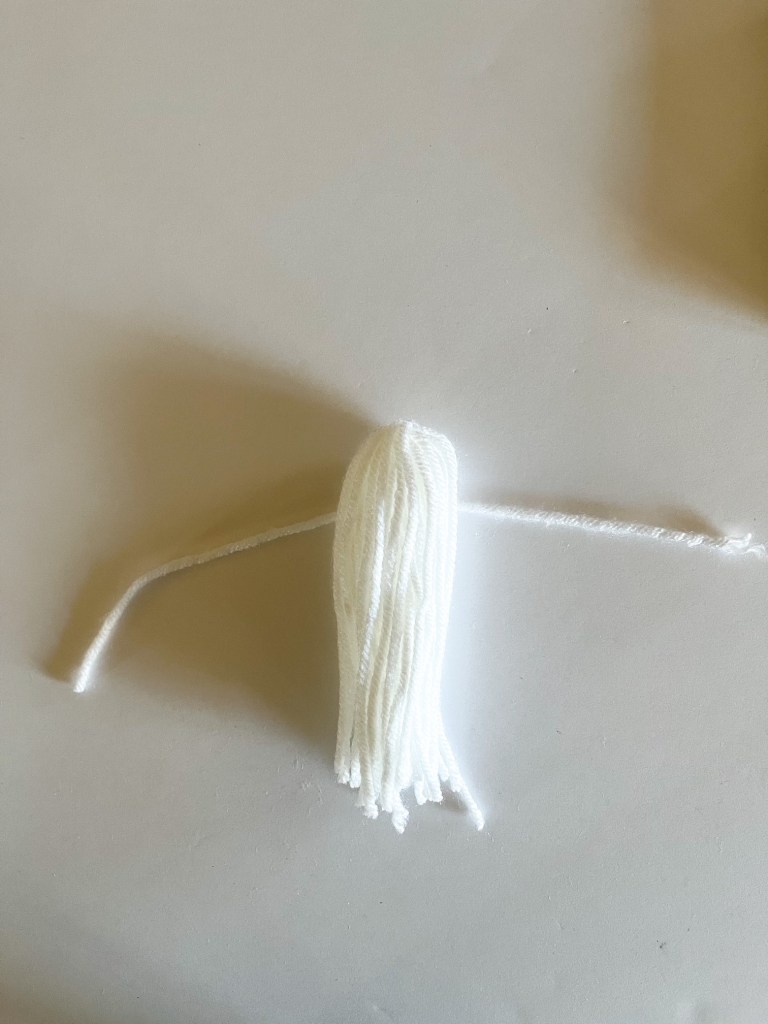
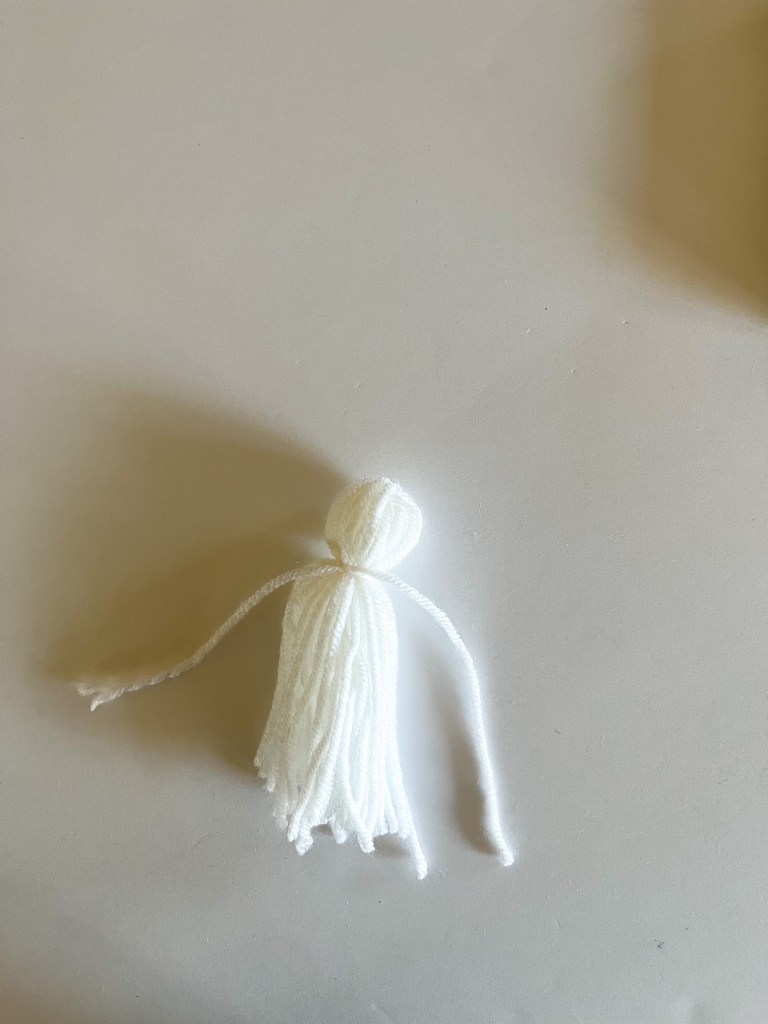
I wrapped it around 20 times to get the right amount of yarn for my tassels. Then use a piece of yarn to tie around the yarn on your book and cut the yarn apart at the bottom. Tie another piece of yarn around where you want the bobble part to be.
Step 2 – Once you have made all your tassels, use a yarn needle to thread the tassels and beads onto the string/yarn in the order you prefer! So many ways to customize your own.
Use your garland to decorate mantels, bookcases, walls, bedrooms, really any space! Also it is so easy to make these types of garlands for any season! I made one to decorate my bookshelf and my daughters bookshelf.
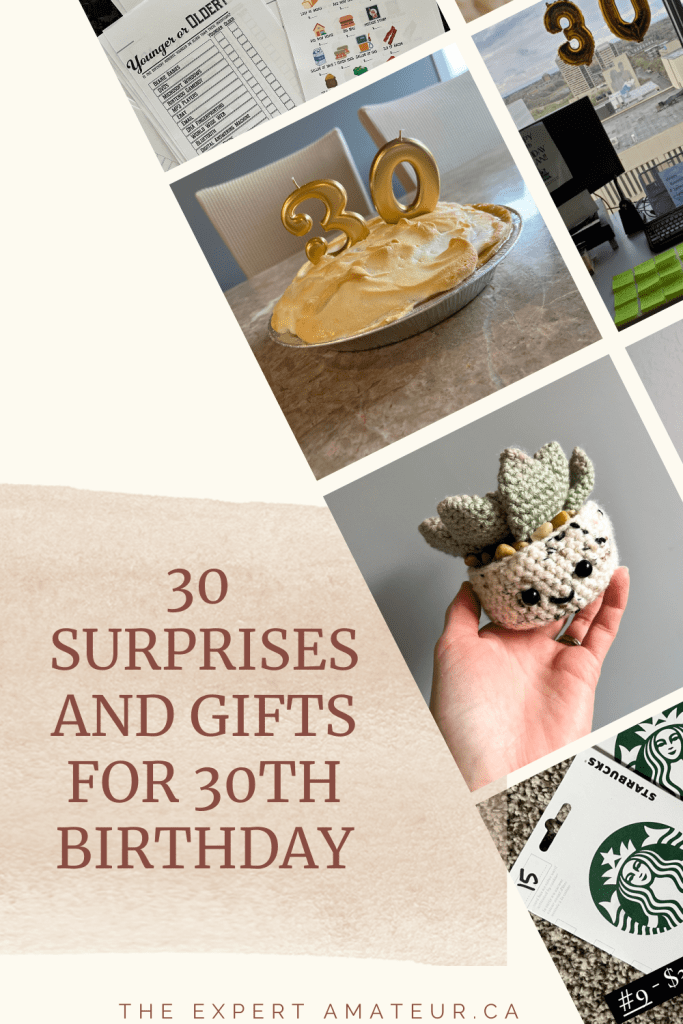
My husband shares his birthday with our oldest daughter, so he often does not get a big celebration. I had to plan something special for this 30th! I decided to give him 30 surprises and gifts throughout the day to celebrate him and it was a hit!! He loved it and was so fun to pull off!
Here are all the 30 items and surprises I had for his special day!
Breakfast! I ordered the Bagel BELT from McDonalds to arrive before my husband left to work along with number 2…
Coffee! A large coffee to go with his breakfast.
30 Post-it Notes of Affirmations. I wrote out things like “You Rock” “I love you!” “You are a handsome devil” and I spread the sticky notes all over his car. I also had a card that explained he would be receiving 30 surprises and gifts throughout the day with a chart to write them in.
30 Post-it Notes of Facts with the number 30 in them. I found some facts on this website and then for others I searched things like 30 pound animals, $30 items, 30 year old inventions, etc. These sticky notes were placed all over my husbands work desk when he arrived at work along with balloons of the number 30.
30 pieces of gum
A framed picture of our family, so that he has a family picture at work. – He said this was his favourite gift of the day!! He appreciated it so much.
30 Lactaid Pills -my husband is lactose intolerant and enjoys his dairy too much to give it up completely.
A birthday card from our daughter Laurel on his desk at work.
$30 starbucks gift card
THE BIRTHDAY TIMES – I created a made up newspaper front page for his birthday that listed some birthday stats and an article about him.
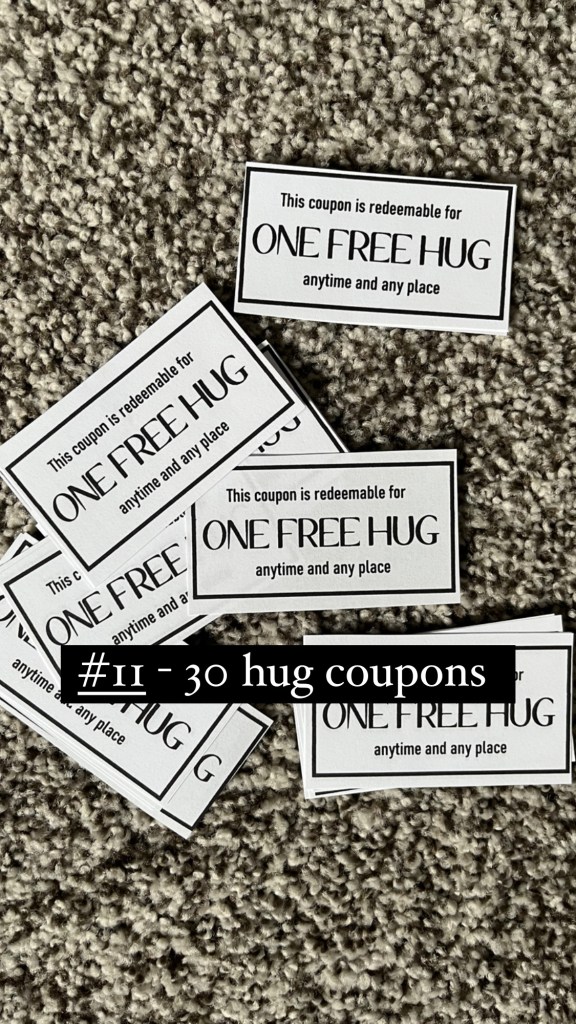
30 Hug Coupons.
Toilet Paper Roll -to help him with the “Dirty Thirties”
Surprised him at lunch time at work and brought 30 cookies for him to share with his coworkers.
30 Radish seeds – He requested that we plant radishes this year.
$30 of lotto tickets – and crazily enough he won $30 from them!!
FitBit – We are trying to get more active and thought it would be a great way to start tracking and be aware of how active he is.
30 coins of a cheap cryptocurrency. My husband is really into cryptocurrency so I got him to buy 30 coins of one of the cheapest currencies and it only cost about 5 cents.
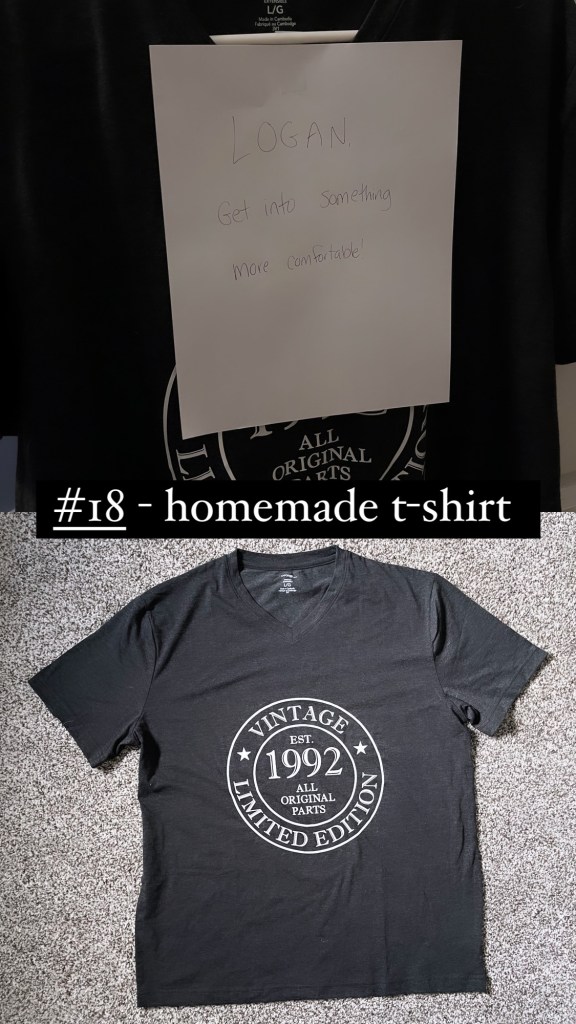
Homemade T-shirt on my Silhouette. I bought a $10 T-shirt from Walmart and then ironed on this pattern I found off of Etsy. You can find it here.
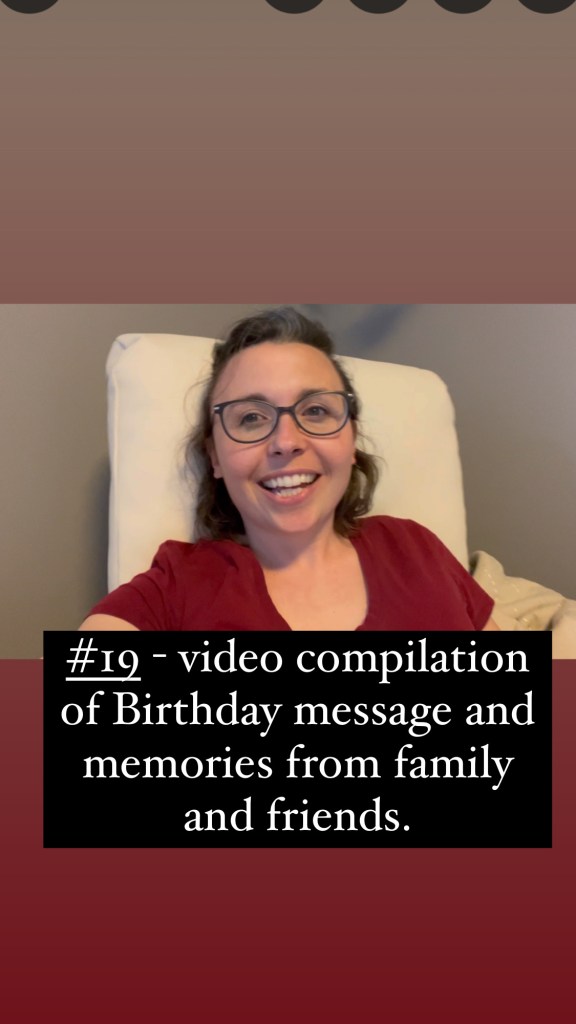
A 13min video compilation of Birthday messages and memories from friends and family.
30 beer
30 min TIMEOUT Coupon that I created. Find the coupon file attached at the end of this post.
Surprise visit from his siblings and my sister after supper!
A game for game night and to play with our siblings.
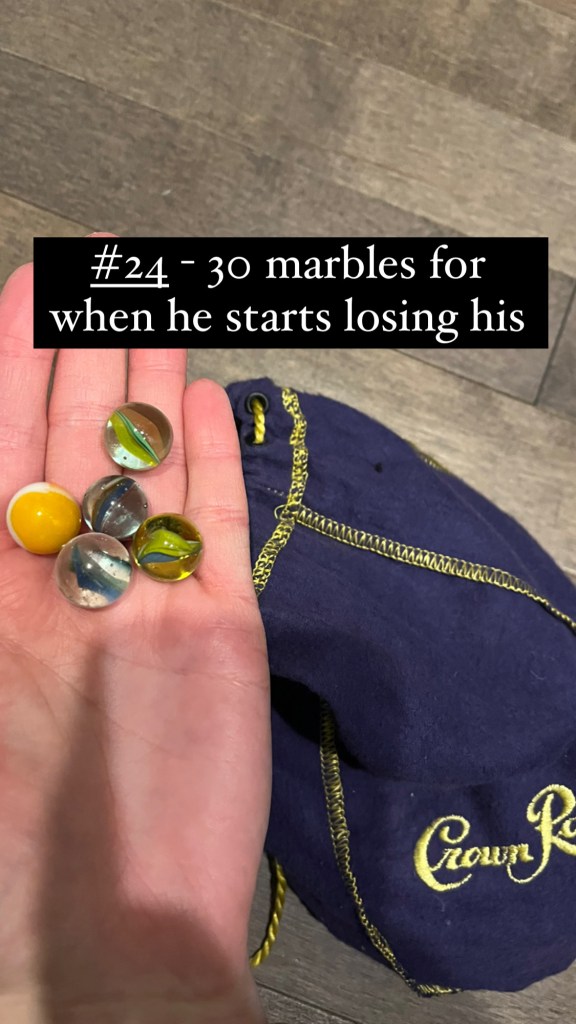
30 marbles – for when he starts losing his haha!
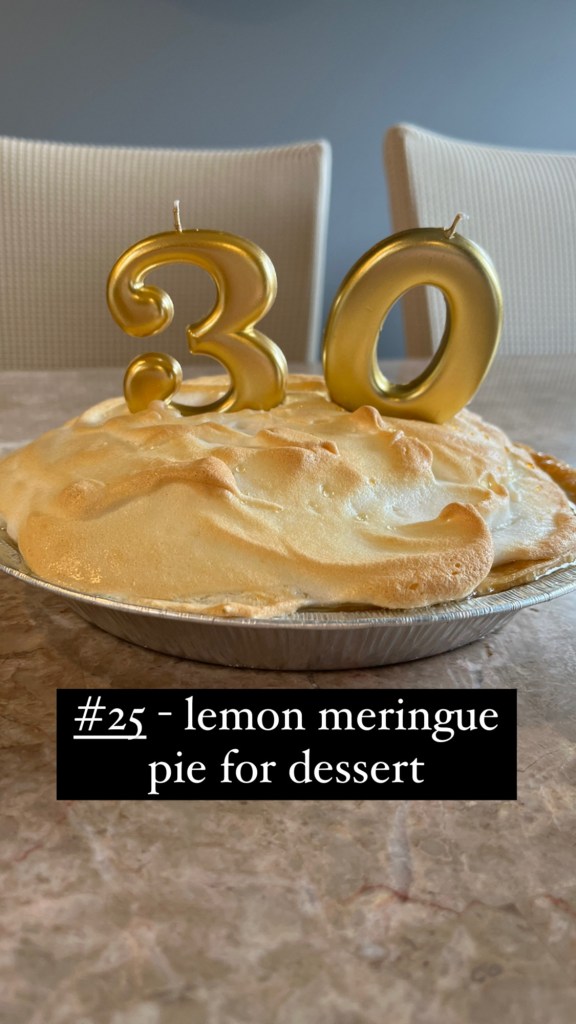
Homemade Lemon Meringue Pie for dessert. His favourite.
A special video message from Laurel, our daughter.
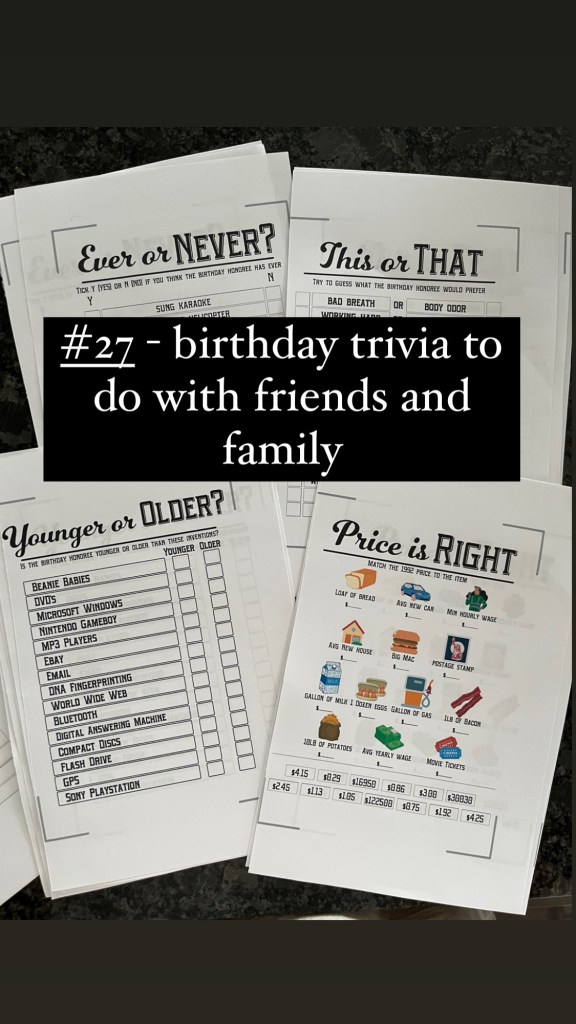
Birthday trivia pages that I found and bought off of Etsy. It was fun to do with our siblings and parents! You can find them here.
$30 – just $30 in an envelope.
30 min Massage coupon. Also can be found in the file at the end of this post.
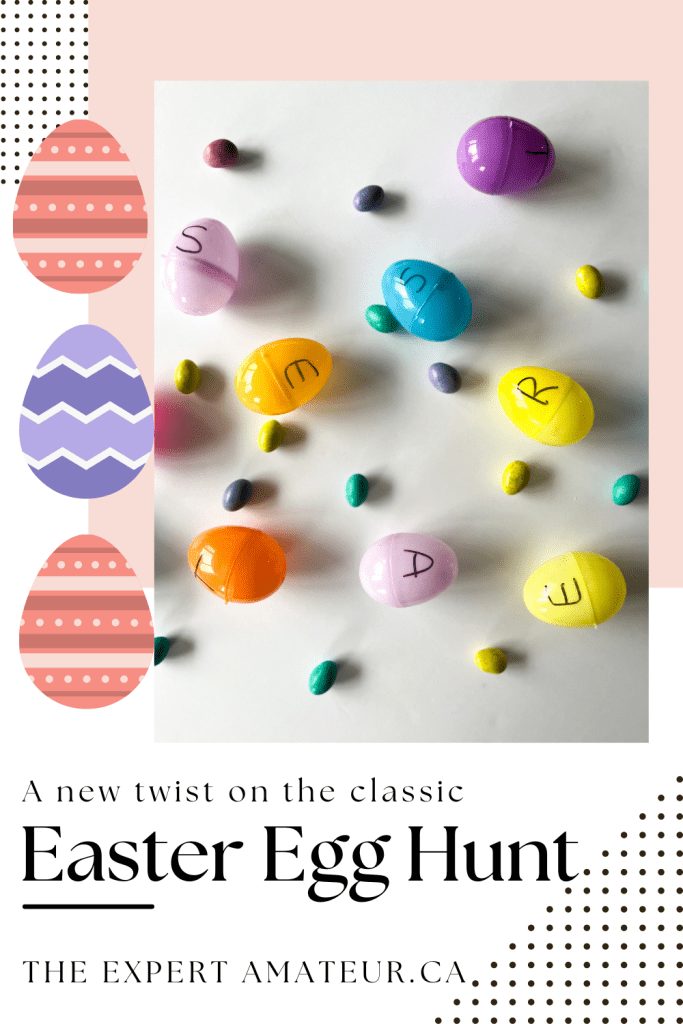
We know kids love a good egg hunt, but eventually they out grow it and it becomes a bit lame, BUT it doesn’t have to!
My sister set up a competitive egg hunt for my husband and I when I was pregnant with my oldest daughter. I was 8 months pregnant running around our kitchen and dining room hunting for all the eggs. But what made it so different? The winner was the first one to find all the letters to the word Easter. I ended up winning haha. It was great!
Materials:
Sharpie
Plastic Eggs
Candy to fill eggs
Prize for the winner
Label all of your eggs with the letters of EASTER (or another word of your choice). The key however, is to make only ONE egg with the letter R. That way, there can only be one winner! Also, plan to hide this egg in the trickiest spot.
Fill all your eggs with candy, chocolate, stickers, whatever you choose. That way even those who don’t win will still get some loot in each egg they find.
It is a super simple way to make the egg hunt a little bit more fun!
ADAPTATIONS
If you have an only child, or only one child old enough to read and make the word Easter, you can also make it a competitive solo hunt. Write out letters to several Easter words on your plastic eggs and see if you child can find all the eggs and spell out all the words.
I think you could also make this a fun classroom game if you are a teacher. You could write out your spelling words, or words of the week on eggs and the students have to find them in groups or pairs. You can make it so that every team has to find all their words. If the weather is nice it would be a fun activity outside!
I hope you have fun with this idea! Let me know if you try it below.