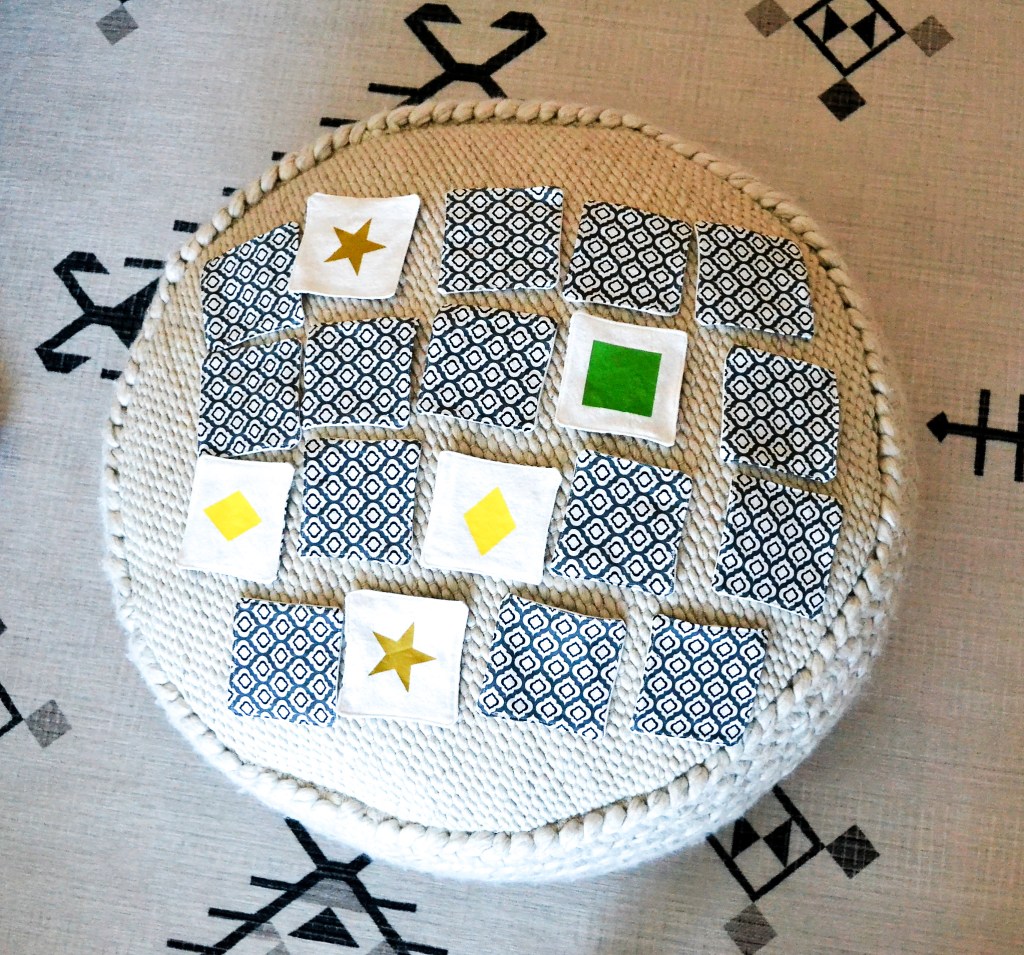
This was one of my nesting phase projects. Due to the start of the pandemic and the unknowns, I went on my mat leave early and had about 2 months at home before baby arrived. I am not one for sitting around, so I quickly busied myself with some projects!
This memory game was so fun and simple to make. The most time consuming part was the cutting and sewing but was definitely not hard, considering I just made squares. You could easily make these cloth cards in to any shape you wanted though!
Time to complete: Plan a half day to work on this at least. I did it in chunks over the course of 2 days.
Materials:
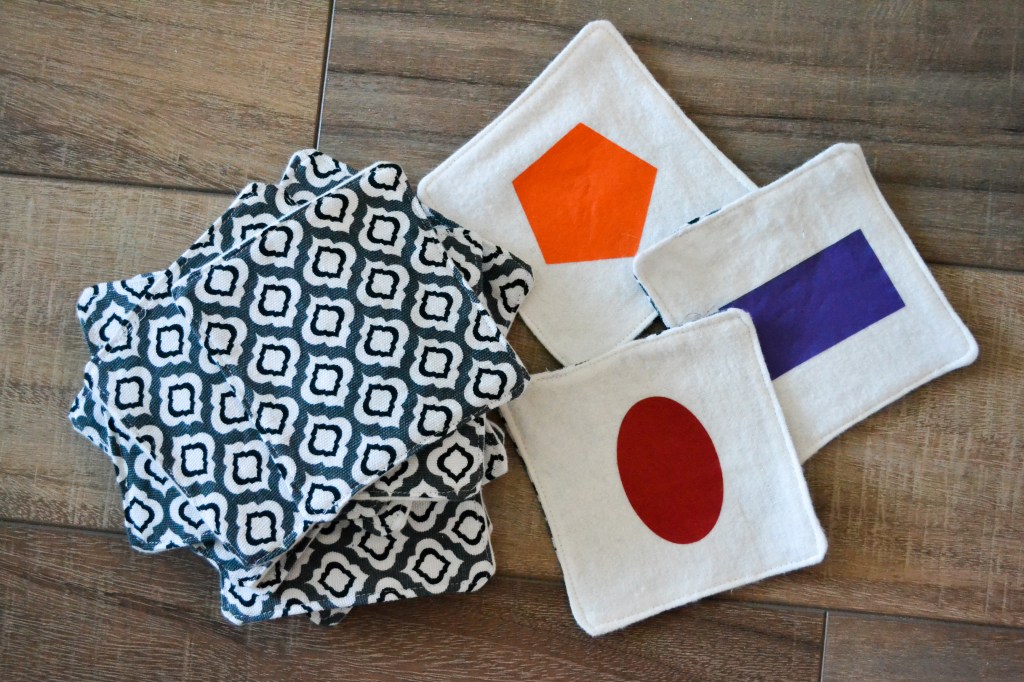
Fabric for the front and back. I used a canvas material for the back so that it was more durable and I used white flannel for the front.
Heat Transfer Vinyl (HTV) for the matching shape pictures. (or you could buy fabric spray to iron on your own shapes made from fabric.)
Sewing Machine
Iron
I used my Silhouette to create and cut out the shapes onto Heat Transfer Vinyl. I had a starter package of 12×12 sheets of vinyl that came with my Silhouette, so I was able to use those to make my shapes all different colors. If you do not have Silhouette or Cricut device, I am sure that you could also use spray on adhesive to attach fabric shapes that you cut out yourself.
Happy crafting and please share your creations below!
** Amazon links are affiliate links. I will get compensated for purchases made through them. This helps so that I can continue to grow my blog and create high quality content for all of you!
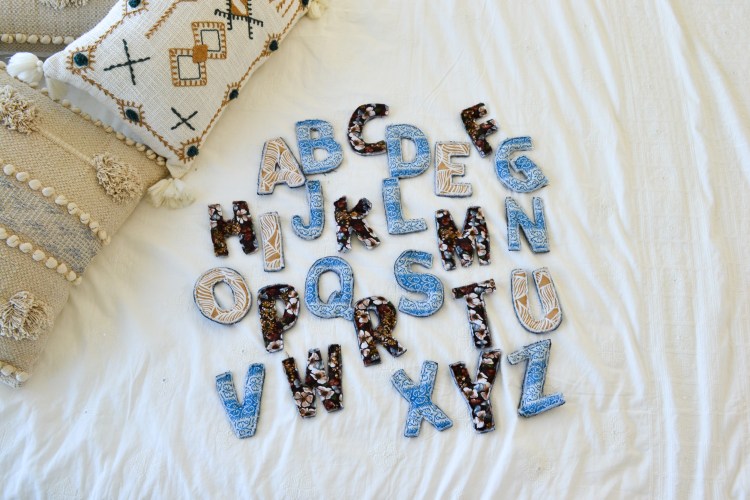
This was one of my nesting phase projects. These letters are soft and safe to be around baby and as they get older you can use them for more educational activities.
Time to complete: I completed this over the course of a week, working on it for a couple hours a day.
Materials Used:
Jean fabric for the back of my letters to make them more durable.
This project was so much fun to make and was a great use of some scrap fabrics I had been saving onto for years.
The fabric letters are a fun way for your child to be exposed to the alphabet at a young age. You can also make multiple of the same letter so that your child can use them to spell out small words.
I made an extra letter L so that I could spell out my daughter Laurel’s name. I am so proud of how these turned out!
Please enjoy and share your creations below!!
** Amazon links are affiliate links. I will get compensated for purchases made through them. This helps so that I can continue to grow my blog and create high quality content for all of you!
What does a baby and a knitted blanket have in common?
Well, they are both cuddly and take 9 months to make!
Now, of course I am speaking as an amateur knitter. I know there are some expert knitters out in the world who could slay this blanket in mere weeks or days, I am sure. I dabble in all sorts of crafts and get distracted if something takes me to long, which is why it took me about 9 months to finally complete this basic knit blanket.
Butttt was it worth it?? YES!
This is my go to couch blanket because of the super soft Bernat yarn.
At the time I finished this blanket, my husband and I weren’t married yet. This blanket would be fought over whenever we had our movie nights. (apparently we aren’t good at sharing!?)
For our wedding, I gifted it to him as a gift to say what’s mine is now Ours. He took that as confirmation that it is DEFINITELY his and uses it all the time.
One of the best things about this yarn is that it doesn’t pill or get matted or stringy after you wash it. It has kept it’s ‘put together’ look and maintained soft after many washes.
I can not find the exact color of yarn I used but it is the Bernat Blanket Yarn. Here is a white version it.
The Pattern for this blanket was found on the yarn packaging itself. It was a free pattern from Yarnspirations. This site has lots of straight forward, easy to follow patterns! I am currently working on another one of their patterns that has a few more steps than the regular stitch. We will see how long this one takes.
** Amazon links are affiliate links. I will get compensated for purchases made through them. This helps so that I can continue to grow my blog and create high quality content for all of you!
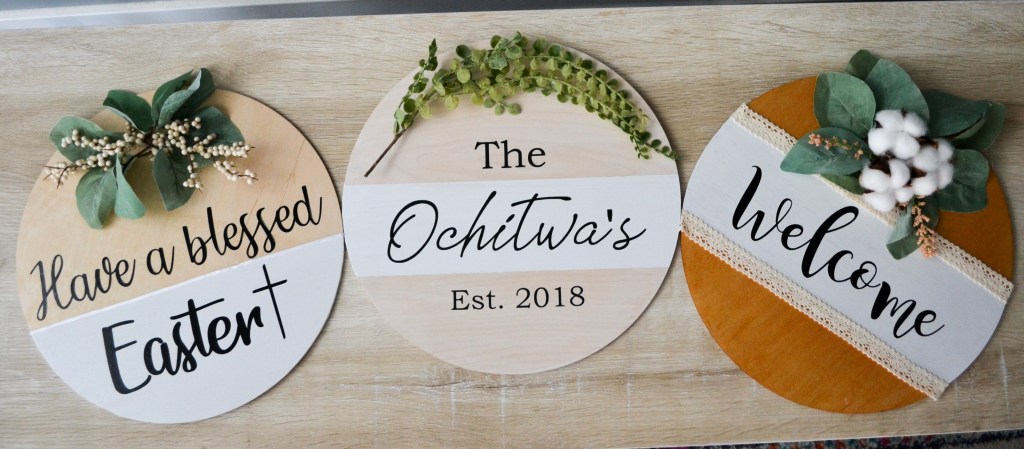
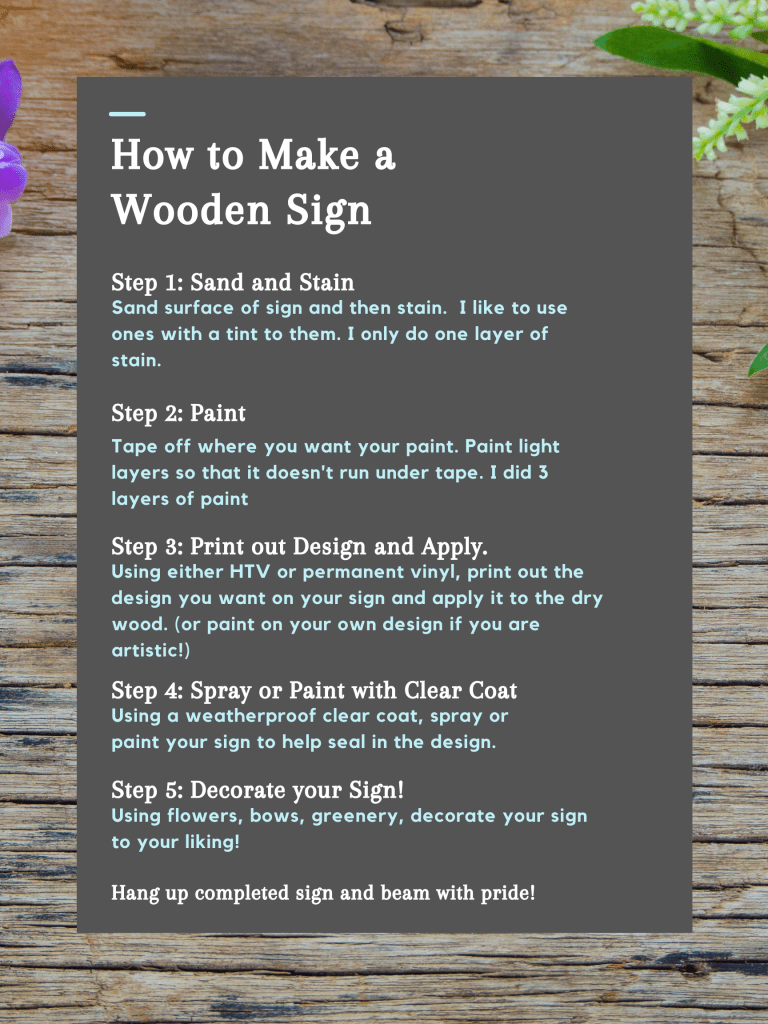
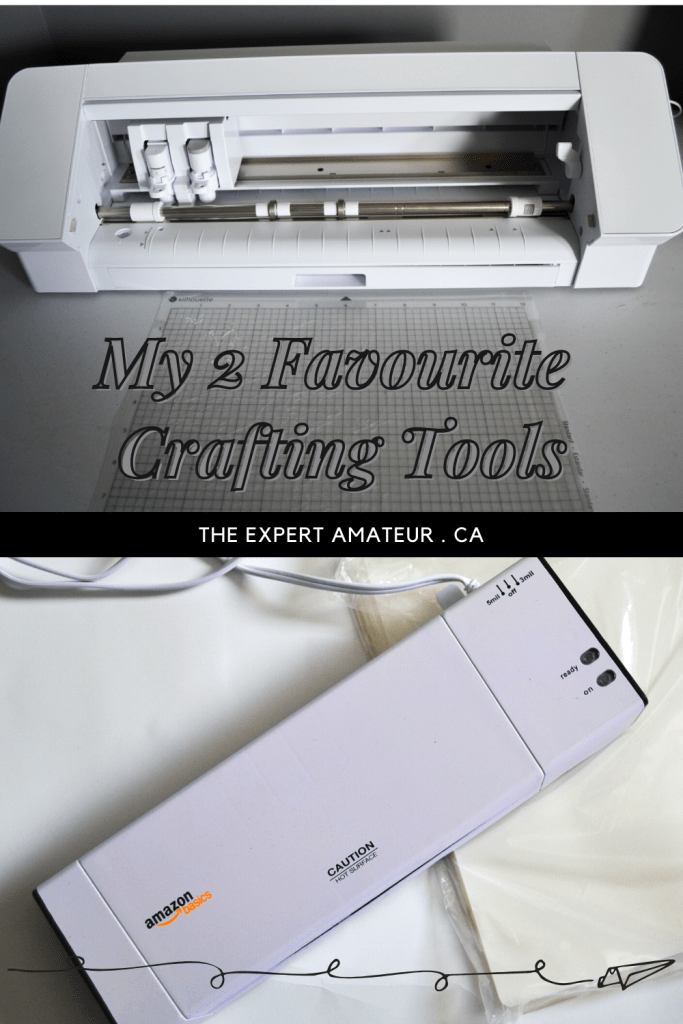
These beautiful signs can replace wreathes, be art on your walls and are great seasonal decor items. This has been something that I have seen a lot of lately in the various crafting blogs and pages I follow and I LOVE IT. I love anything involving wood and the Silhouette! There are so many types of signs you can make. I am also loving the crisp white decor vibes that are trending right now, so I had to add those into each of these signs.
Time to Make: A day – just to give yourself drying time for the paint. Assembly and painting only took around 30 mins. total.
Vinyl – Heat Transfer Vinyl for the Ochitwa Sign, Permanent Vinyl for the Easter and Welcome Sign – check out my blog about Permanent Vinyl Vs. Heat Transfer on wood to learn more.
Wood Stain – I used this white tint for the Ochitwa sign and this cedar tint for the Welcome sign.
The wooden rounds that I have purchased are very thin. I like this because they aren’t as heavy to hang, but the one downside is I can’t put screws or nails in the back. However, hot glue works great to attach string or lace. I also ordered command hook stickies to hang the rounds so that you don’t see any hooks.
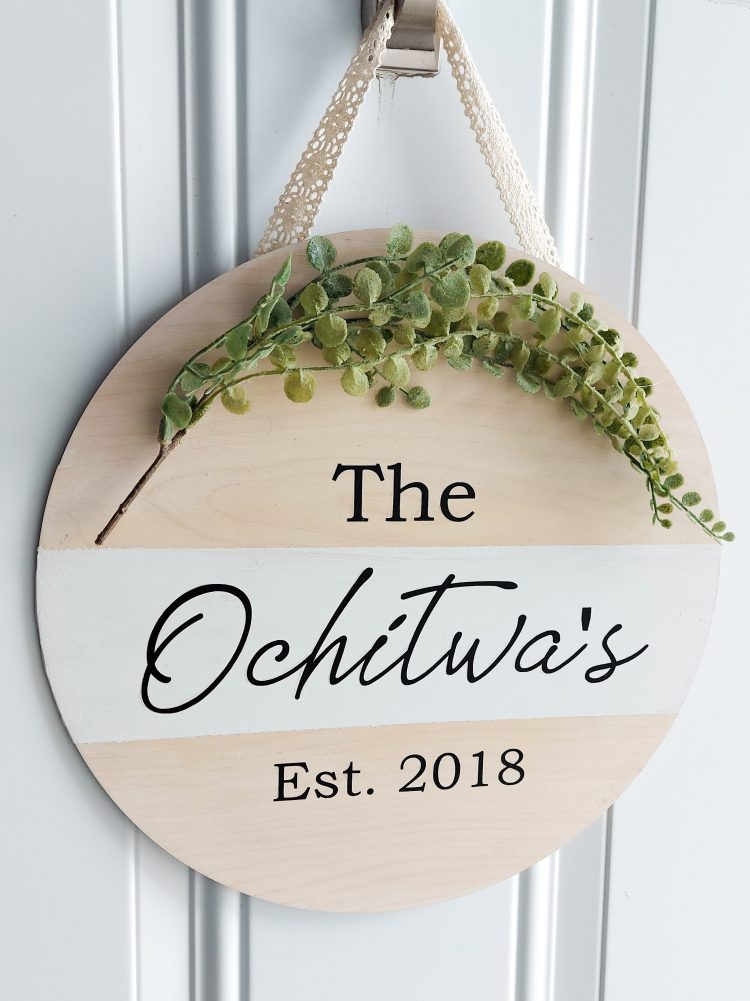
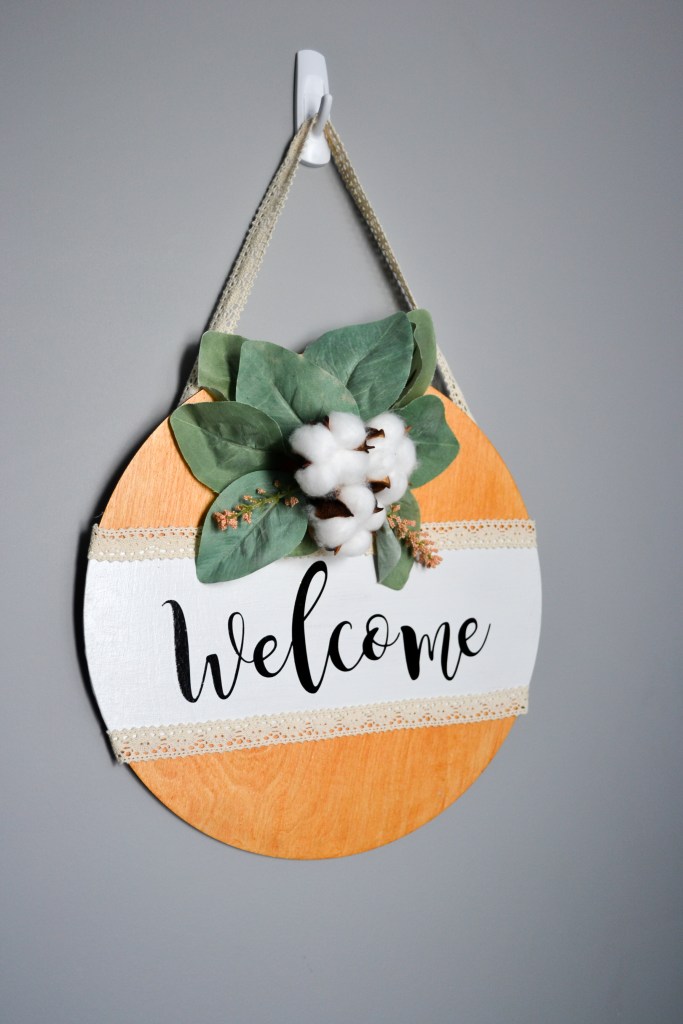
The first one I made was The Ochitwa’s sign. I have always wanted to do a project with our name and make something to display. I am very happy with how this turned out. The Easter and Welcome signs I did right after, and tweaked a few things based on what I learned from my first sign.
The vinyl used on The Ochitwa sign is made from heat transfer vinyl and on the Welcome and Easter sign I used permanent 651 vinyl. There are pros and cons to using each.
The one aspect that people may not think about at the beginning when making signs is the font. There are so many amazing fonts to use. You can find thousands of free fonts for personal use online but it is important to note that if you wish to create signs to sell you must purchase a commercial license for the font.
Overall I was very happy with how these signs turned out! Normally I can’t make something look this good on my first try.
I did forget to spray a clear coat on my Ochitwa sign before adding all the greenery (I was too excited!) so that’s why it has more of a matte look but, it also shows a bit more flaws from my heat transfer because of this.
I will definitely be making more signs soon! I want to try and make some using stencils to paint. We will see how that turns out in comparison.
Happy crafting!
** Amazon links are affiliate links. I will get compensated for purchases made through them. This helps so that I can continue to grow my blog and create high quality content for all of you!
Cutting out letter’s, words, pictures on paper – I created many bulletin board letters for my classroom with this.
Cuts thin fabric and felt
Create templates for painting – I made stencils for my father-in-laws Trans Am he is working on so that he could paint the Trans Am logos on accurately.
Many other applications I have yet to try including, creating stickers, cards, layered shadow box pictures, to name a few.
The software for the Silhouette takes a bit of learning to navigate but there are several video tutorials that you can find online that explains the software. I am still learning all the tools it has.
One of my favourite features on this program is how easy it is to create a file to cut or print of a hand drawn design. I took pictures of my niece’s drawings and printed them out on heat transfer vinyl and put them on tea towels. They were given as birthday gifts to her Grandma and Great Grandma.
I also like that I can access the Silhouette Studio without having to be on wifi. This was one of the big reasons I chose the Silhouette over the Cricut models. I can take my laptop anywhere and work on designs. You have to be on wifi to work in the Circut design studio.
Where can you purchase one??
I bought my Silhouette Cameo 4 through Amazon on a sale day, BUT they currently cost $455. However, Costco Canada now carries them and you save $150 by purchasing it through Costco online. It is only $300. If you don’t have a Costco card you can also purchase it for cheaper through Michaels Canada at a cost of $350.
Considering this only cost me $30 to buy, I would say I have gotten really great use out of it for my classroom and for at home. Some of the things I have used it for include:
Homemade Playdough mats
Dry Erase work sheets – math, patterns, symmetry, drawing
You could also make a reusable weekly menu, daily tasks, or calendar pages.
Lamination pages are also a great price on Amazon and one pack lasts a long time!
If you are a lover of crafting and have the budget to spare. These two products are definitely worth it!!
** Amazon links are affiliate links. I will get compensated for purchases made through them. This helps so that I can continue to grow my blog and create high quality content for all of you!
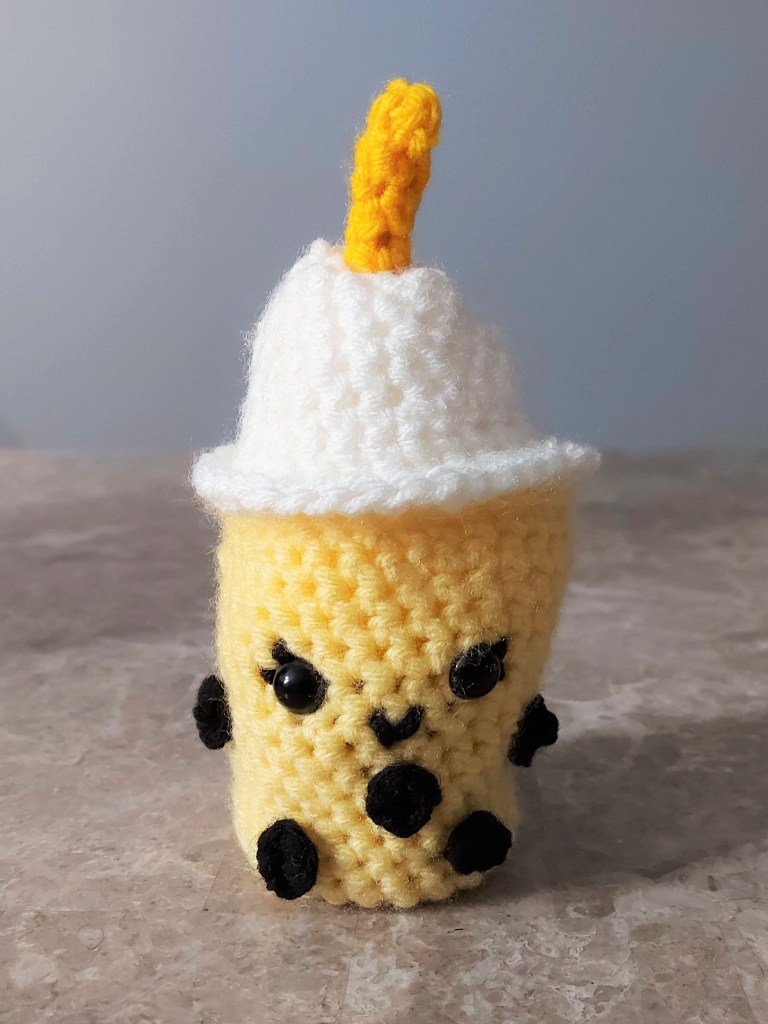
I recently tried out crocheting and found some quick and simple projects that are easy to follow for a beginner! The Cozy Chipmunk has created so many adorable patterns that you can use for free online or pay for a PDF downloaded version.
The first one that I tried out is her Tea Bag Bookmark. I am an avid reader and so I had to give this one a go! It was also a small enough project that I was able to finish it in about an hour and I am sure many people could finish it faster.
The nice thing about this project is you need very little yarn and you can use any colors you like.
The other pattern I just had to create was the Lil Boba pattern. My sister has converted many people in my family to avid bubble tea fans and so I had to make this Lil Boba pattern for her! This took me about 3 hours to make.
I loved making these two projects and will definitely be making them again as gifts for people. I also look forward to trying out more patterns that The Cozy Chipmunk has too offer.
Are there any good crochet websites you have found? Let me know down below!
** Amazon links are affiliate links. I will get compensated for purchases made through them. This helps so that I can continue to grow my blog and create high quality content for all of you!
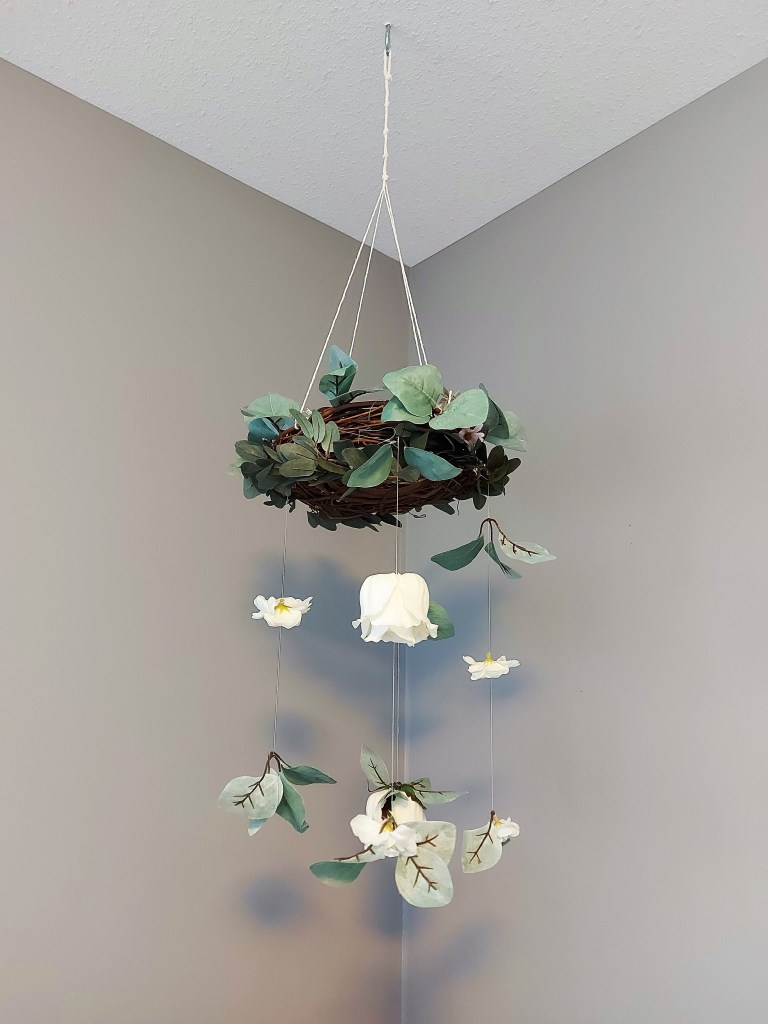
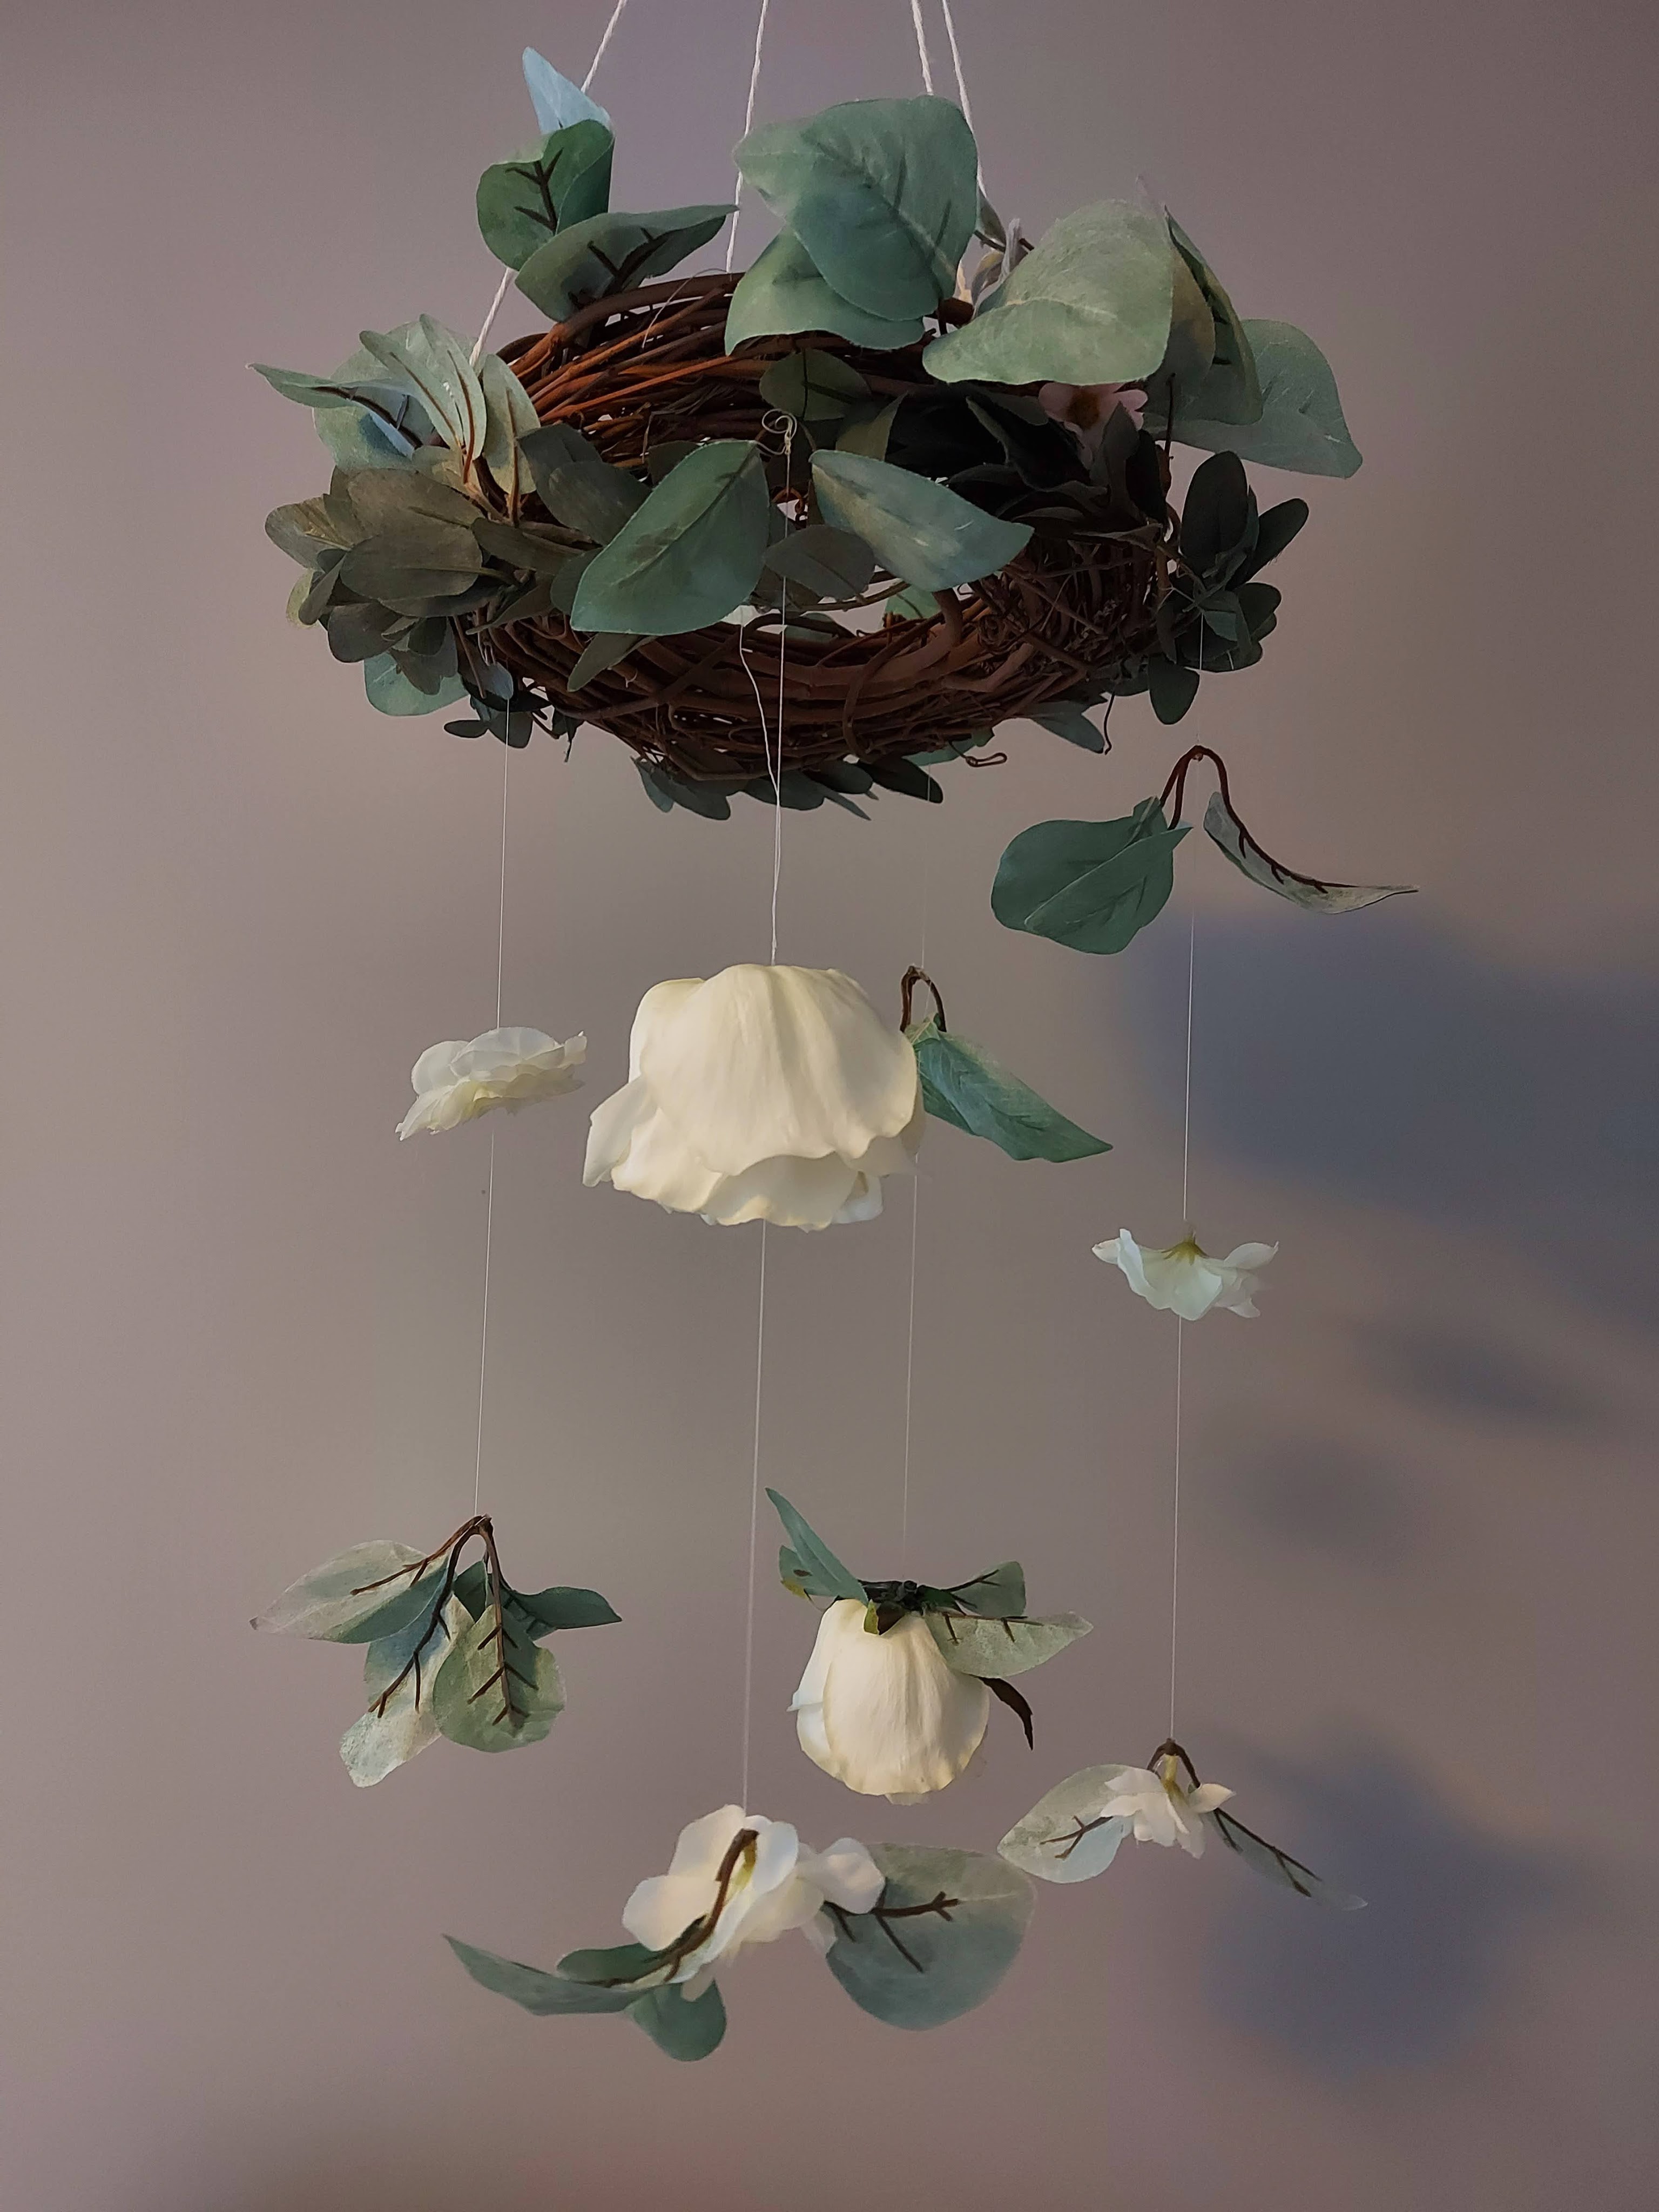
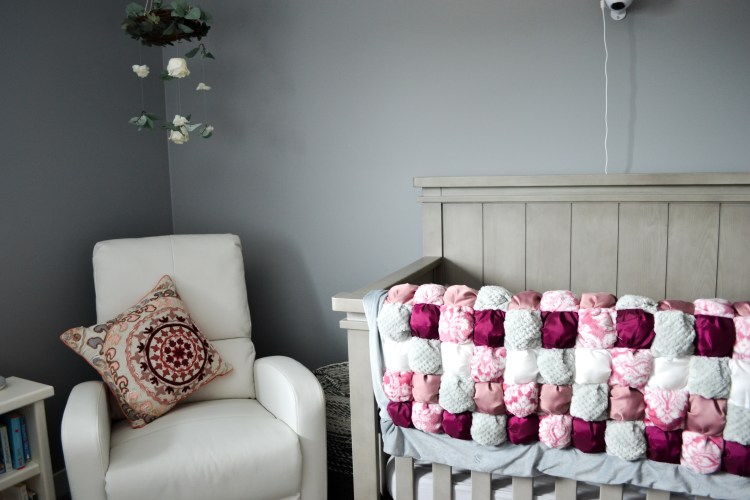
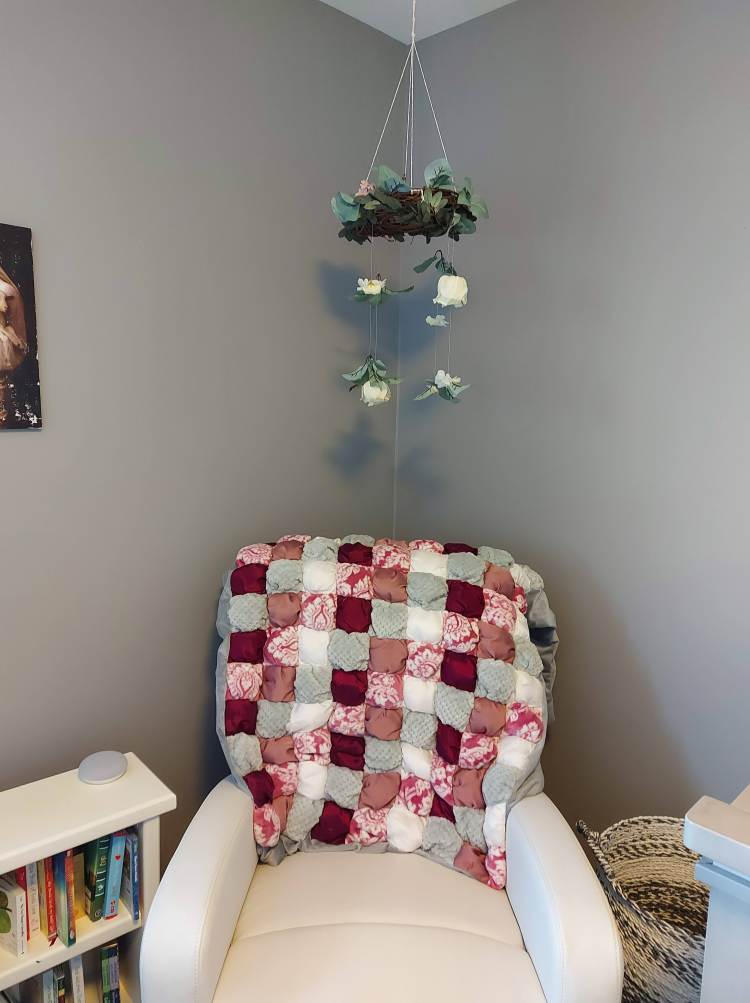
This was a project that started after looking at many beautiful floral mobiles on Etsy but not willing to pay the $100-200 price for one. (Now after making one I can see why they are priced so high).
The biggest cost of this project is 100% the flowers and leaves needed to make it. I wanted them to look realistic and with that comes cost. Michaels was my go to spot for the greenery. I only purchased items in the 50% off section and it still cost around $60 to make. (I do have some extra leaves and flowers that I can put to use on something else.)
One rose on its own was $6 at Michaels. If I was patient I could have ordered some roses off of Amazon and gotten some for a lot cheaper, although I think the quality of the ones from Michael’s are better.
There are definitely cheaper options for greenery and flowers also at a Dollarama or Dollar Tree but I found the flowers unrealistic and shiny. They also didn’t have as many options compared to Michaels.
I also opted for a more expensive wreath base that is thicker. It is definitely possible to make a beautiful mobile with a less expensive simple embroidery hoop but I like the woodsy aspect of the one I choose. It also made it a lot easier to weave in and place the leaves and flowers.
To create the flower and leave strands I got out my trusty sewing thread. (actually I took my sisters haha) I used a needle and thread and put the thread through the center of the leaves and flowers. Once I found the spot where I wanted the flower to stay I hot glue gunned the thread to the back of the flower. Most flowers and leaves have a hole going through them already so it was a simple process to thread them on.
Hanging my mobile became another problem unto itself. I had chosen the thick wooded wreath for the beauty but soon realized it weighed quite a lot and the last thing I want is for this mobile to crash down onto my daughter. I went to Home Depot and found a hook that is for hanging items up to 10 pounds (the wreath is about 3 pounds). I also decided to put the mobile above the rocking chair instead of her crib. (JUST IN CASE)
Overall, if you have the time to specially customize your own floral mobile it is cheaper and you can choose the exact look you want. If you don’t have the time or patience, this Canadian Etsy company has amazing options!
There are also some GORGEOUS mobiles on Etsy that are made of felt flowers. (This may be on my crafting list for the future.) Check this beautiful wreath out!
Happy Crafting!
** Amazon links are affiliate links. I will get compensated for purchases made through them. This helps so that I can continue to grow my blog and create high quality content for all of you!
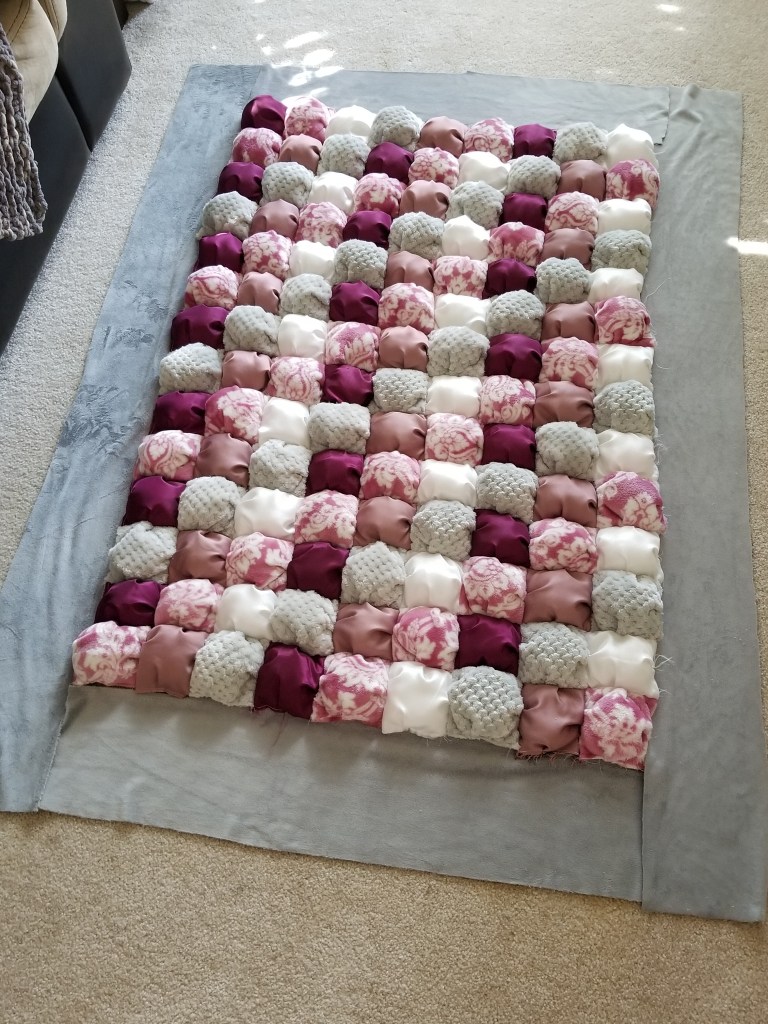
One of my favorite things in life are BLANKETS! Absolutely love them. I am a naturally cold person and so I can never have too many cozy blankets around. This particular blanket, however is for my baby girl. It is fantastic for our home because we have hardwood on our main floor so I used it as a blanket to lay her on the floor before we got an area rug. The puff patches make a super comfortable cushiony feeling for her to lay on.
I rarely sew, so this is easily a beginner project but turns out looking like you are an expert!
Time: 8-10 hours I don’t remember the exact time but it took maybe 2 days of working on it. If you sew frequently I am sure you could easily whip it up in an afternoon!
WHAT YOU NEED:
Materials:
5 fabrics for the quilt patches – the discount section in your local fabric store is the go to place for this project! I choose similar colour tones for the patches.
Old sheet for the back of the puffed patches
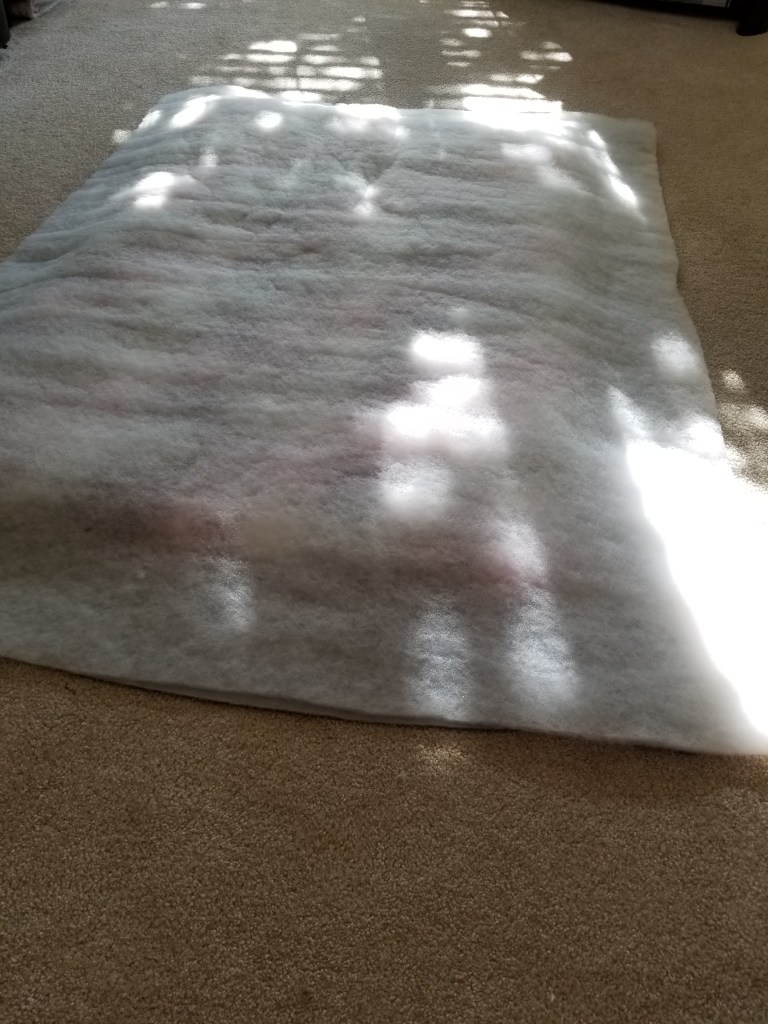
Minky fabric for the back-This is the priciest part of this project. If you want a less expensive project, a fleece or flannel would work as well.
Cotton filling for puffed patches – I got mine from Walmart but Amazon also has some for a decent price.
Sewing Machine
Pins or clips– to hold the fabric in place when sewing. Makes it SO much easier. (especially if you are an amateur sewer like me.)
STEP 1 – LAY OUT – The first step for me was cutting out all of the fabric squares and laying them down to get a visual of what the end result would be. I made each square a half an inch bigger so that it gave me the space for sewing. Any size of square will work!
STEP 2 – MAKE PUFFS – Once your squares are all cut, you will with then make a backing for all those squares with an old sheet or scrap fabric. This fabric will not be seen, so use up those scraps! The square backing however, should be a 1/4 inch smaller than your top layer on both sides of the square, so that your puff pops out more when stuffing it. Sew the quilt fabric and the backing together, leaving a little space to stuff it full of cotton fluff. Sew together completely.
STEP 3- SEW PUFFS TOGETHER – Start sewing those cute little puffers together to form your beautiful quilt.
STEP 4 – THE BORDER – I used a minky fabric for my border. Measure it out and surround your quilt with the fabric. You choose the width you would like!
STEP 5 – BATTING – After the border was attached I measured out my quilt batting. Yes, your puffs will make a cushiony blanket on their own, but adding a thin layer of quilt batting gives it an extra layer of warmth and cushion.
STEP 6 – SEW ON BACKING – I used the same grey minky as my border for the backing of my quilt. Make sure you are sewing the batting to the border of your blanket as well so that it doesn’t move when you flip it inside out!
STEP 7 – SEW AROUND EDGE – I sewed a stitch around the whole border of my blanket so that it looked same all the way around. This also makes it so you don’t notice where you closed the blanket from the outside,
There you have it! Easy-peesy puff quilt.
** Amazon links are affiliate links. I will get compensated for purchases made through them. This helps so that I can continue to grow my blog and create high quality content for all of you!
QUICK, FUN and EASY way to have your little one practice the alphabet sounds! I saw an idea similar to this and knew I could easily create my own version of this page with materials I had in my house and a couple hours later, voilà!
I printed my worksheet out on photo paper, but cardstock would work just as great. (You want paper thick enough to still be sturdy when laminated.)
I bought long strips of velcro from Dollarama and cut them down to the size I needed and stuck them on. They are VERY sticky. I am not worried about them coming off.
The rest is pretty straight forward. Laminated both the worksheet alphabet page and the picture page. THEN cut out the images after laminated. Apply the velcro the worksheet and the pictures and you’ve got yourself a reusable, fun worksheet to practice alphabet sounds!
Now, you may not have all the supplies for this. (I mean, honestly, why would you have a laminator?) SO if you don’t, just print off the worksheet and have your child cut and paste the pictures OR have them draw their own pictures!
Included in the download is also a black and white version along with a set of colored alphabet flashcards.
** Amazon links are affiliate links. I will get compensated for purchases made through them. This helps so that I can continue to grow my blog and create high quality content for all of you!
Hi, I’m Ambria Ochitwa. Now, in person, I wouldn’t dare scream this phrase out loud to a bunch of strangers but apparently that’s okay if you are online and want to be successful in the blogging world. Get NOTICED! Soooo here is the low down:
I am a new mom to a wonderful baby girl named Laurel who was born in the midst of lock-down in a worldwide pandemic.
I have a wonderful husband who is in sales and can talk your ear off if you give him the time of day. (Especially topics that include crypto-currency, market gardens, and, well, anything business related). I love him dearly!
I am currently on maternity leave but my profession is teaching and I have taught for the last 6 years. Put me in front of a group of adults to talk and my face will be beet red. Put me in front of a group of kids and I’m thrivin!
My hobbies include ANYTHING and EVERYTHING crafty, bookish, DIY and cooking and..basically I feel like an olden day pioneer – acting like I need to create and produce everything myself.
My family has referred to me as a granny on several occasions throughout my 29 year existence so far. (I have had gray hairs since my early twenties so maybe I am some sort of female Benjamin Button?)
ANYWAYS, the point is. I want to share my love of teaching and crafting with you all and maybe, hopefully find some way to create a small stream of income for myself so I can be the boss of myself. (Isn’t that what we all want??)